How Often Should I Water My Peace Lily?

Peace lily or spathiphyllum (scientific name) is a closet plant that can thrive on little water and light. Peace lilies provide aesthetic pleasure due to their looks, clean air due to their cleansing properties and many more benefits.

Peace lily is an easy to grow houseplant that novice planters adapt well to. They make a beautiful addition to minimalist homes and offices, clean their surrounding air, remove mold spores and mildew etc.

Despite peace lily’s easy maintenance, a number of beginners are plagued by questions like”how often should I water my peace lily.”

Taking care of a peace lily is simple and is made easier when one is aware of the basics. In this article I shall endeavour to tell you all about peace lilies, their care and maintenance and how to keep them healthy.

Before we dive into the tips regarding the care of a peace lily, lets have a look at the benefits it provides.

How Often Should I Water My Peace Lily Plant?

Peace lilies do not need too much water, they thrive best when watered regularly yet sparsely. In general, you should water your peace lily plant once a week.

Watering once a week is the perfect amount of time a plant needs to absorb the water it needs, drain out the excuse and further dry itself.

To ensure that you do not underwater or overwater the peace lily, check the soil’s dampness before watering. If the soil is damp do not water, if it is slightly damp water a little and if it is dry water well. 

Following the principle of checking dampness in the soil will ensure a healthy plant that doesn’t face issues due to watering problems.

Also Read: Why are the Leaves Falling Off My Angel Wing Begonia?

How often should I water my peace lily in winters?

Peace lilies require little water, as you would be aware by now. In winter most plants require less water than they usually do, this is because unlike summers water doesn’t get absorbed by the sun during winter.

During the hot weather peace lilies should be watered once a week, but only after checking the level of dampness of the soil. During winters water your plant once every two weeks.

In winters you must follow the rule of watering plants only after checking the dampness of the soil. It is very easy to overwater your plant in this weather, so check the water level of the soil.

Make sure that the soil drainage is well and properly functioning or the plant will get water-logged and die.

If you keep your peace lily outdoors, bring it inside in the winters since cold and drafts are not healthy for them. Keep them indoors in a consistent temperature.

Also Read: How Long Can a Peace Lily Go Without Water?

How to Know If Your Peace Lily is Facing Watering Issues?

There is a simple way that can enable one to check if their peace lily plant is facing watering issues i.e overwatering or underwatering.

Yellow and brown leaves

Apart from aging, the most common reason for yellowing or browning of leaves of a peace lily plant is watering problems. Both underwatering and overwatering will cause the leaves to discolour.

If you notice the leaves getting discoloured, check the dampness of the soil and the drainage. If all looks good, the issue is underwatering and if the soil is wet then the problem is overwatering.

Also Read: Why Are the Leaves on My Christmas Cactus Limp (Drooping Leaves)?

Benefits of a Peace Lily

There are a lot of benefits that peace Lily plants provide, some of them are in noon while others not so much. Here are all the various advantages of having a peace lily plant.

Purifies air

Peace lilies purify their surrounding air and provide fresh air. Our houses are home to a number of pollutants ranging from fine dust to microbes. We Siri helps in cleaning these pollutants and provide clean air.

Peasley absorbs pollutants like benzene,xylene,carbon monoxide and formaldehyde. It absorbs 60% of the pollutants in the air and adds moisture to the air as well.

Aesthetic value

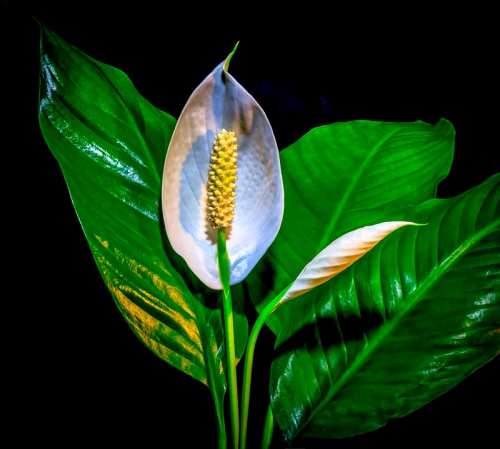
Peace lilies are a beautiful, lush green plant with a white flower and a hooded white leaf that protects the flower. The beauty of a peace lily is the reason why it is so commonly used for interior decoration.

Be it a minimalist house or a professional, spruced up office-a peace lily enhances the aesthetic value by a high degree without changing the tone of the place.

Peace lilies look beautiful as centerpieces, as a single décor piece, a style statement, in a green aesthetic corner and so much more.

Low maintenance

Who doesn’t like things that are wasted by us and also are low maintenance? Peace lily is a plant that is very easy to sow, grow and take care of.

Even if you have a busy schedule and can’t spend too much time taking care of your plant, you can accommodate the very little needs of peace lilies in your schedule.

It needs little water, low light, and barely any special treatment.

Also Read: Why Peace Lily Flower Turning Yellow, Brown or Black?

Good sleep

A little known fact about peace lily is that it promotes a restful and healthy sleep. In the fast-paced modern world that glorifies hustle and overworking, finding peaceful sleep can be an insurmountable task.

So many people suffer from insomnia and dissatisfying sleep. Peace lilies promote good sleep by increasing the humidity level making it easier to breathe, their beauty provides a sense of rest and they also control mold and spores in the air.

They calm the mind and help one to slow down. If you are trying to fix your sleep hygiene, a peace lily plant will greatly help you.

Absorbs acetone vapours

Acetone vapours are harmful for our health. Products such as parents, nail paint, rubbing alcohol and varnishes contain acetone which emit harmful vapours.

High exposure to these harmful vapours can cause a headache, concentration problems, fatigue, low BP and also speech problems. Peace lily plants absorb these harmful vapours and prevent damage to our health.

Peace and good fortune

Those who believe in the unknown might be familiar with the significance of a peace lily in terms of fortune. Peace lilies are said to bring peace and good fortune.

Peace lily plants promote prosperity, hope, purity, health, calmness, peace and innocence. It is considered sacred due to the various fortunate benefits it carries.

Caring for peace lily

The aforementioned list would have convinced many to get a peace lily for their home, office or desk. If you are thinking of getting a peace lily plant, here are the basics about caring for a peace lily.

Water

A very common mistake while taking care of a peace lily is overwatering and underwatering. Peace lily is a low maintenance plant that does not need too much water or light.

Overwatering a peace lily will essentially kill it by water-logging the soil and restricting the roots from absorbing water needed for photosynthesis i.e the process that makes food for the plants.

Underwatering has a similar effect on the health of a plant as it doesn’t give enough water to the plant to be able to stay alive.

Both underwatering and overwatering is bad for the health of a peace lily.

Water the peace lily once a week but always check the soil for dampness and water accordingly.

Light

Just like water, a peace lily doesn’t need too much or too little light. Simply speaking peace lilies need everything in moderation neither too high nor too low.

Peace lilies can be kept under a source of artificial light or in front of the windows. If no light reaches them at the place they are kept in, put it in a well-lit place every 2-3 days.

Repotting

Peace lilies Can benefit from repoting or dividing when they outgrow their containers. One can check if the plant has outgrown its container when they notice that it is drooping less than a week after being watered.

If you are repotting, move the plant to a container that is at least 2 inches bigger than the last one. If dividing, use a sharp, sterile knife to cut through the middle of the root ball and replant.

Fertilizer

Peace lilies don’t need too much fertilizer, you can add fertilizer once or twice a year. Summer is a good time for adding fertilizer.

Cleaning

The leaves of a peace lily can accumulate a lot of dust so it is advised to clean the leaves regularly. To clean, put the leaves under running water to wipe down gently using a damp cloth.

Do not use commercial leaf shines as they barely do any work. Be gentle with the plant while cleaning.

Temperature

Keep the plant with a consistent temperature ranging from 65 to 80° fahrenheit. In case of cold or drastic hot changes in temperature bring the plant inside and keep it in a composed environment.

Drainage

This plant can be susceptible to root rot so make sure that it has a chance to dry out between watering. Ensure that the container drains well.

Either choose a container that has drain holes within it or make small holes using a live by yourself. Put a dish under the container to catch water that drains out.

Peace Lily does not need too much water and so it is important that the excess water is able to drain out and the peace lily dries.

Hope this helps, take care of your peace lily!

Why are the Leaves Falling Off My Angel Wing Begonia?

People identify the name “angel wing begonia” with a beautiful plant that embraces large green leaves and heart shaped blossoms and flowers. 

This is also the reason why many people choose to grow Angel wing begonias as their houseplants. Growing to the maximum heights of ten feet, they are easy to grow, plant, and propagate.

These South American natives go by the scientific name of Begonia coccinea or begonia aconitifolia. While it is true that Angel wing begonias do not present much of a challenge while growing, it is also true that they are not as forgiving as their counterparts.

That is, if not taken seriously, these plants can backfire and revolt in ways that would create damage both to the plant and to your yield. One of these damaging conditions is the dropping leaves of angel wing begonias. 

In the following article, we would chalk out the causes that are responsible for such conditions and what can you do to treat them. 

Why Are the Leaves Falling Off My Angel Wing Begonia: Reasons and Solutions?

Have your begonia leaves started falling spontaneously? Are you confused? Well, don’t be! We have some of the most probable causes and their treatments listed below, that would surely help you out. 

Also Read: Why Peace Lily Flower Turning Yellow, Brown or Black?

Water 

The most obvious cause is that you are overwatering your Angel wing begonias heavily. If the plants are not watered evenly, the effects start to show in their leaves. 

Call it the excessive weight or the after damage, but leaves cannot bear with the burden and start to fall off immediately. 

Solution

Do not water the plant over the leaves. Instead, do it near the base of the plant, on the soil. Further, install a container that offers good drainage properties. Do not let the water clog, and water the plant only when the soil gets visibly dry.  

Humidity 

Begonias, like other plants thrive in humid conditions, primarily because it supports their food needs and photosynthesis. If you place your plants outdoors, then you might not know about this problem.

However, the indoor conditions remain devoid of ample moisture and humidity that is otherwise required for plants to grow, thereby making their leaves dry and dead. 

Solution

Install a humidifier inside your house, and regulate the humid conditions as per the requirements of your plant. 

If you have a lot of plants indoors, you can also fetch yourself a mini greenhouse to create the right conditions for your plant.

Also Read: Coffee Grounds for Pothos: How to Use

Infestation 

Given the beautiful flowers and blossoms, it would not be fair to imagine that angel wing begonias do not attract worms and insects. 

General worms, pests and insects sit over the leaves of your plant, thus making them dry, and in adverse conditions even killing them.

Cutworms are the most expected visitors on your begonia leaves.

Solution

Observe your plant regularly for any holes, or unusual spots. Inspect deeply for worms and insects. Next, get rid of them as soon as you spot them.

Use neem oil spray, and organic pesticides to do so. Remember to spray a little extra on the plant foliage and stem.

Also Read: How to Get Rid of Bugs on Jade Plants

Repotting 

Repotted recently? This should explain the sudden falling and rotting of your begonia leaves. If you have adopted an improper method of repotting, then you have possibly invited this problem upon yourself. 

Repotting during the wrong time, in the wrong pot size is another less known cause for Angel wing begonias shredding healthy leaves. 

Solution

Do not repot during the winter or summer seasons. These weather conditions do not present a favourable time for growing begonias in a new environment. 

At the same time, choose a pot that is slightly bigger than the previous pot. This will not restrict the movement of your plant, thereby making it easier for them to adapt to new surroundings. 

Also Read: How Much Sunlight Does Peace Lily Need?

Light 

Light is the most potent factor for carrying out the process of photosynthesis. Inspect the amount of light that your begonia needs, and create conditions that support the right kind of plant growth and flourishment. 

However, do not shower your plant with excess light. It will not do any good either. Sometimes the kind of begonia you foster does not demand ample light.

Solution

Spot the right place for your plant before growing them, either indoors or outdoors. The spot should receive regular, indirect, and bright light for most part of the day. 

Use grow lights (artificial) to give greater support to your plant during low light conditions. 

Also Read: How to Revive a Dying Pothos Plant?

Taking care of angel wing begonia 

You might have been successful in preventing your beautiful houseplants from shredding healthy leaves unnecessarily. But, how to make sure that your angel wing begonia remains healthy ever after? 

We have brought to your screens some of the general care and maintenance tips about your houseplants. Have a look at them and tell us how many you already follow!

  • To give proper attention and nutrition to your plants, it is important to feed them right. Fertilizers are the best source of nutrition for angel wing begonia. Select an organic liquid fertilizer and spray them over your plants weekly, or once in two weeks for best results.

A balanced fertilizer with NPK of 10-10-10 is preferred. 

  • A potting mixture that is moist and is filled with the goodness of organic matter is ideal to grow angel wing begonia. The root and stem system of this plant also demands a little heavy soil, since it allows the roots to spread and establish well. 
  • When choosing the potting material, always incline your preferences towards clay and terracotta, other than plastic and ceramic. The initial preferences will aid you in swiping away excess moisture from the pot. 
  • It does not matter if your plant is grown in outdoor soil or in a planting pot, excess sitting of water in the pot will lead to root rot and brown spots on their leaves. 
  • Pruning might create confusions for many plant lovers. But, that does not mean that we should not prune it. In fact, it is the most important practice. 

Pruning provides the plant with a fresh base to restart the growth process, making it healthier and bushier than before. 

An important tip for pruning is to regularly clean the shears when pruning different plants. This will essentially restrict the transmission of plant diseases from one plant to another. 

  • Flowering of Angel wing begonias take place only in the summer and during the onset of spring. To keep the blooming of these attractive flowers throughout the year, make sure to prick and pinch them off from the base very carefully. This practice would encourage the growth of new and beautiful flowers, varying in eye-catching colours. 
  • The best indoor place for growing angel wing begonias is near the east and west direction of the window. The light that comes through this direction is ideal for plants to thrive. 
  • There are numerous cultivars of an Angel wing begonia that are present commercially. Fortunately, these varieties do not expect different kinds of treatments and preventive measures. So, you can apply these tips to your plants, whether they are Begonia million kisses elegance, Begonia Apricot Shades, or Begonia Super cascade. 

Conclusion 

Known for performing the best and growing in the most convenient conditions, angel wing begonias. While they are not particularly tough to grow, the aforementioned tips should make your planting experience easier and more fun. 

Keep reading more of our content to get easy growing, care, and maintenance tips for your houseplants. 

Holes In Pepper Plant Leaves: What Causes and How to Prevent Them

Growing a pepper plant at home is not easy, but definitely a beneficial bet. If you are developing a Pepper plant all by yourself, then you would be well-versed with the difficulties that it invites. The most common being the continuous presence of a hole in pepper plant leaves.

Holes in pepper plant leaves indicate the damage that has been incurred by dangerous pests and insects. If you have found such damage being done to your plant, then you are in the right place.

In the preceding article, we would be raising questions regarding the causes and preventive measures that are required to be taken in case of pests attacks. So, without further ado, let us begin our quest.

What causes holes in pepper plant leaves?

If you are growing pepper plants in your garden or backyard, you must be faced with the possible question of “why are there holes in my pepper plant leaves?”

Well, you do not need to ask this question anymore. We will not only tell you what causes these holes but will also provide you with all the possible treatment methods so that your plants remain healthy ever after.

Also Read: Does Swiss Chard Grow Back After Cutting?

Cutworms

Cutworms are the most probable source of holes in your young pepper plants. Extremely young pepper plants attract cutworms, and that is why they attack these plants to do the damage.

Often, they go for pepper plant seedlings and attack them to weaken the core of your plant before the plant starts bearing fruits.

Aphids

Aphids do not only like feeding on pepper plants but also love feeding on almost all the vegetable plants. That is why they have been cited as the most dangerous insects for the kingdom of vegetable plants.

They attack the bottom-most sap of the plant by sucking onto them. So, in addition to holes, your pepper plant leaves will also show signs of wilting, yellowing, and dying. The solution to this source of massive damage is mentioned in the next section.

Flea beetles

Just like cutworms, flea beetles are also a fan of young pepper plants. That is why immature pepper plants demand and expect more attention than fully grown plants. In addition, flea beetles are known to leave tiny holes on the leaves of numerous pepper plants.

Their jumpy nature adds to the ease of moving from one plant to another.

Also Read: How to Grow Pointed Gourds at Home?

Corn Borers

Pepper plant pods are the main attack targets of corn borers. The leaves of pepper plants do not seem to attract them as such. Instead, they start attacking the plant by affecting the inside of the plant pods. In no time, the damage spreads to others pepper plants in your garden as well.

These caterpillar-like insects can be easily spotted and treated.

Other Pests

The aforementioned pests are primarily the reason behind recurring holes in the leaves of your pepper plant.

However, these are not the only ones to blame. Insects like leafcutters, tomato hornworms, moths, beet armyworms, butterfly larvae, grasshoppers, slugs, and snails are also dangerous to the progress of your pepper plants.

To identify these pests, you should arrange regular visits to your garden. Check and examine your pepper plant for any trail, holes, or damage everywhere.

The evidence can be observed under the leaves, on the leaves, on the stem, around the stem, on the soil, or on the ground surrounding the plant.

Also Read: How to Grow Chinese Cabbage from Cuttings?

How to Prevent Holes In Pepper Plant Leaves?

Since the only reason for holes in pepper plant leaves is the presence of pests, the preventive and treatment strategy also revolves around the same issue, that is, getting to remove them.

In the following sections, we will look at some pest-specific strategies that would essentially draw them away. This will be followed by tips that are generally helpful in finishing and repelling all kinds of pests.

Treat plants according to the type of pests.

Each pest has its own requirement regarding food, nutrition, and energy, and that is what makes it essentially different from other pests. Therefore, if we wish to target specific pests, then we need to adopt particular strategies.

The pests we mentioned above can be derailed from entering the garden spaces by following the practices listed below.

It is suggested that the steps are followed as they are listed, without any deviation in the methods.

Cutworms

As we have noted above, cutworms attack the seedlings of pepper plants. So, if you direct seed your plants to grow them, it would enhance the chances of cutworms attacking your plant. But, if possible, skip this method and go for something else.

However, if cutworms are troubling your pepper plants, a naturally made pesticide would be acceptable to keep them away from your plant.

The process would be more endearing if the worms are spotted as soon as they begin to thrive.

Aphids

Aphids are another dangerous source of destruction to pepper plants. However, there is not much that you need to do to drive away these pests.

You can use the most straightforward method involving water. Wash the affected part, and the aphids will go away. To some, this may seem a bit time-consuming. Nevertheless, it is effective.

You can also use natural pesticides to kill them off as an alternative to washing away with water.

Flea Beetles

Flea beetles are the easiest pest to identify; they keep flying all the time, complemented by their jumpy nature.

The solution is very easy. All you need is a potent mixture of water and soap in a spray bottle. Spray the plants thoroughly.

When your plant is ready to harvest, wash them and rinse them off any dish soap for making them edible to human beings.

Corn Borers

It would be easier to get rid of corn borers if we identify them in the earlier stage of damage and try to draw them away. Ladybugs are a natural solution to this problem of perpetuating corn borers from your garden.

Find a way to attract ladybugs to your garden. Next, try to place them near the pepper plants. Ladybugs feed on the eggs of corn borers, thus stopping their breeding process.

If this method does not work, wear your sturdy gardening gloves and try removing these pests from your hands.

For better results, you can supplement these ideas with a non-toxic pesticide.

Also Read: Coffee Grounds for Pothos

Additional tips: for unknown pests

Apart from what we have mentioned above, there are a lot of other considerations that need to be taken.

This is a specific matter of fact when one is not able to identify the pests they have on their pepper plant leaves.

That’s right! If you feel that identifying the right kind of pest is a hassle, then you can shift to adopting additional tips, which usually work with each kind of pepper plant pests.

This way, you can make sure that your leaves remain hole-free and undamaged for more extended periods.

Follow the below-given tips to enjoy a hassle-free pepper gardening process:

Ducks or chicken can be of specific help.

Keeping ducks and chicken in the garden where you are growing pepper plants is beneficial to the leaves, as they help finish the pests that feed on pepper plants by feeding on them.

Since the pests act as a source of food and nutrition to the poultry animals, they will hunt for them and finish them off before they create any undue damage or harm.

Maintaining cleanliness

In order to prevent the lingering of pests in your garden, analyze the area around your pepper plants and keep them effectively clean. In order to clean the area, begin by maintaining a fixed schedule.

Next, surf through different stores and select the best cleansing agent for this purpose. Begin by removing tall grass and unwanted crops (weeds). Uncleanliness is the main reason that pests are attracted to your garden.

Which plants to keep at bay?

If peppers are kept near certain plants, it can be a hazard for their leaves. Plants like garlic, onion, alfalfa, melons, and sugar beets attract insects and pests like thrips, leafrollers, and whiteflies.

If these plants are kept near pepper plants, pests can quickly attack their leaves, causing giant holes in them.

Deploying cardboard collars

If the problem of pepper plant leaf holes is troubling you to the core, then perhaps you would be willing to take out some additional time for deploying cardboard collars, which are essentially stiff, next to your pepper plant base.

This way, if cutworms plan to attack your pepper plants, they would fail, owing to the preventive shield created by deploying stiff cardboard collars.

Silver Mulching

Silver mulch repels pests and insects of all sorts, whiteflies the most. Therefore, if you have trouble surrounding them, find silver mulch from an authentic commercial store, and spread it evenly across the boundaries of your plant.

This is a tested and reliable method for driving away pests. Besides, it would also create a nutritious ground for your pepper plants to thrive. 

Spreading diatomaceous earth

Diatomaceous earth is a mixture that is essentially known to keep away insects of all kinds. In fact, it was earlier used on a regular basis as an insect repellant. It helps in killing insects, which can be harmful to the health of your plant.

If you cannot find the original mix of diatomaceous earth, do not worry! You can spread the food-grade diatomaceous earth type instead.

It is also suitable for the health of your leaves and provides a fertile ground for plants to grow. However, take special care during the monsoon season or when it starts to rain. This is because, under such circumstances, the mixture tends to wash away with water.

Wait for the rain to stop and reapply it again after some time.

Turmeric

The most straightforward home remedy for treating pests is turmeric. First, take some turmeric and mix it with water. Then, put it in a spray bottle. Shake the bottle. And your spray is ready!

Use this solution to treat your plants. Spray it on your plants twice a day for best results. Garden bugs and pests find it hard to resist the smell and properties of turmeric, so it keeps them away.

Conclusion

One does not need to be a gardening guru or an agricultural expert to fight back the harmful pests, which are a serious source of threat to pepper plants.

As we have seen above, whether or not you know about the exact worms that have attacked your plants and caused holes in their leaves, you can treat them and prevent them from returning next time.

Pests like cutworms and flea beetles are the most common causes of visibly large holes in your pepper plant leaves. However, it is never too challenging to grow your own pepper plant crop in a backyard or garden.

If you witness holes in the leaves of your pepper plants even after administering the treatment, as mentioned earlier, consult a professional, a gardener, or an experienced botanist.

Coffee Grounds for Pothos: How to Use?

Coffee grounds for Pothos are very necessary as coffee is the most excellent and organic source for Pothos. Pothos get nutrients with the help of coffee. It consists of various nutrients that are essential for the healthy growth of the Pothos. Pothos are the plants that need the micro and macronutrients that help in enhancing the soil structures and the health of the Pothos. Using coffee grounds adds various humic substances to the soil. 

You can also try making a compost kind of tea using the coffee grounds, which is an excellent growth kind of food for the Pothos. Coffee ground is also used by the people growing Pothos to balance the soil’s ph level at substantial ratios, and hence the good health of Pothos is guaranteed.

Do Pothos like Coffee Grounds?

The answer is quite mixed as it depends on various situations and circumstances. The soil having a high Ph level can take coffee grounds as a positive additive. Whereas the soil, which consists of high acidity, can make the plant die if you add coffee grounds to it.

So the Pothos does like coffee grounds but in not every situation. So one should check the soil’s Ph level before adding coffee ground to it.

Also Read: How to Revive a Dying Pothos Plant?

Testing the acidity of the soil

Before going to the use of coffee ground in the soil, acidity must be checked for that take a sample of the soil. Put the taken sample into a container containing water and add baking soda to it then study the reaction. You will easily figure out whether to use the coffee grounds or not.

How to Use the Coffee Grounds?

First, take the coffee grounds and then sprinkle them one by one on the soil of the Pothos. It will act as an excellent soil fertilizer and will help it in its growth. 

You can use coffee grounds as a substance as mulch. You can add the coffee grounds to the compost. This is what most farmers advise the people to do. Don’t mulch the grounds of coffee on the seedlings or seed. If you do that, the growth of the seedling or the seed will stop immediately, and hence this is a harmful move.

Using them as mulch is fine till the time you add various organic substances like the compost and the leaf molds. The coffee grounds can add moisture and protect the plant from multiple diseases and from the fungi and bacteria; hence, healthy growth is promised.

How can you use the grounds of coffee as a substance as mulch?

  • For this, add a 1/2-inch good layer of the said coffee ground onto the required or present soil.
  • Then add a 4-inch mulch layer.
  • Then use a rake so that they do not clump.
  • You can also try mixing the grounds of coffee with the said compost, or you can also mix it to some other organic substance or matter.
  • After you are done mixing, the next step you can do is to mulch around the given soil of your favorite pathos. In this way you could complete the process.

Also Read: How Much Sunlight Does Peace Lily Need?

Other ways of using Coffee Grounds 

You can use coffee grounds in many other ways, like adding them to the pothos’ potting mix. This will certainly help you to increase the soil’s nutrient quotient. Make sure to add only 10 to 20 percentage of the above coffee grounds mixed with various other organic substances.

You can also create a compost form of tea for the Pothos. For this, you will need at least 5 gallons of water and another 2 cups of the grounds of coffee. Mix the above mixture and then soak them for overnight usage. In this way, you can prepare a compost tea and can use it for the Pothos.

Then it is time to water the soil. Coffee grounds are a very slow nitrogen-releasing component. So watering the Pothos within a span of 48 hours is very beneficial. 

When watering these Pothos make sure that the water penetrates deep down the roots of the plant and replenishes the soil very well. Therefore the plant will remain healthy and will not at all die.

You can also go for the drip-feeding method. In the bottle, fill the compost form of tea and then keep the bottle upside down with a hole so that the plant remains hydrated with time intervals automatically; in this way, you will not have to pose a greater pressure on yourself in taking the care of the plant.

Also Read: How to Get Rid of Bugs on Jade Plants?

Various benefits of using coffee grounds for Pothos

  • Coffee grounds help the plant to grow and keep it away from diseases and disease-causing organisms that can even hurt the plant or even kill it.
  • The grounds are efficient in binding the pesticide residue and is efficient in eliminating insects and pests.
  • Coffee grounds help in moderating the temperature of the soil and hence prevent the plant from too much dryness.
  • So balancing of water retention becomes very easy for the plant.
  • Coffee grounds are popular in producing various humic substances and hence helps in improving the fertility of the soil. It also benefits the architecture of the root.
  • Coffee grounds are famous for improving the structure of the soil. This ingredient is capable of enhancing the basic structure of the soil and therefore making the plant grow naturally well.
  • With coffee ground, you can easily enhance the copper, magnesium, and various other soil components.
  • Coffee grounds are famous for producing a Carbon/Nitrogen ratio, which is quite enough to quickly break down the various compost matter.
  • Coffee grounds in the soil also helps to keep the cats away from your plant. As cats hate the smell of coffee so if you sprinkle coffee grounds in the soil, the cat will not litter there.
  • Coffee grounds might make the growth of fungi possible, so to keep the plant away from this, use some organic matter while using coffee grounds to reduce this negative effect on the plant.
  • The coffee ground also acts as barriers and is known as very solid barriers to reduce this negative effect use organic matter.

Conclusion

So coffee grounds are very beneficial for your Pothos. They help in the quick growth of the plant. Coffee grounds are very beneficial in making the soil fertile. A good mixture of coffee ground is essential for making the soil fertile and useful. Coffee keeps the plant in good shape, but if used carefully. First, check the soil for its nutrient component and then decide whether to add the coffee grounds or not. Not every soil type can have coffee grounds. Then follow these above steps on how to use them and then use the coffee grounds for growing healthy Pothos. Then use the above-mentioned watering techniques and rest assured to get good Pothos in your house till you are there to take care of them.

Adding coffee grounds to the Pothos is essential and makes the soil in perfect condition. Pothos are lucky plants, and one should grow them in their house. Pothos can be grown well if correct and necessary steps are implemented while growing them. So grow these plants and live a happy and healthy life at home and outside.

How to Get Rid of Bugs on Jade Plants?

The jade plant is a lovely plant that is commonly seen as an interior house plant. It is indigenous to Southern African areas. The Jade plant is often known as the money plant. It encourages the growth of lovely yellow and green leaves. It may be grown and transplanted in both small and big pots. Despite its beauty, the jade plant draws a wide variety of pests. In an effort to keep the attractiveness of your Jade plant, one should keep bugs away from it.

If you’re not sure how your jade plant is acting strangely, it might be due to insect invasion. However, what pests damage the jade plant, or how do we get rid of them? Let us investigate!

How to Get Rid of Bugs on Jade Plants?

Bugs that commonly attack jade plants include:

  • Spider mites
  • Gnats
  • Mealybugs
  • Aphids
  • Scales

Ways to get rid of them –

Step 1 – Make use of Rubbing Alcohol

If you detect little scale insects (typically small & brown), take any rubbing alcohol then wipe it on the leaf surface. If the bugs are crawling up many branches, fill a spray container with alcohol to spray their leaves. Bring the plant outdoors with a napkin or a brush. Swipe or brush the insects that are clinging to the plant. Take back the plant into the house.

Also Read: Why Peace Lily Flower Turning Yellow, Brown or Black?

Step 2 – Cold, and moist exterior weather should be avoided.

Place your Jade plant in a sunny location to avoid moths and mealy bugs. The heat of the site helps warm the ground, reducing the wet conditions required for these sorts of pests to collect and survive off your Jade Plant. A Jade plant typically requires 4 hours of direct sunshine every day, and more if feasible. They do best in the early morning or late afternoon sunshine. Keep your Jade plant away from the hottest part of the day. Give immature Jade plants as little bright sun as possible.

Step 3 – Watering

Keep an eye on how much watering you give the Jade plant. The ground should constantly be on the dry end or just slightly wet. Excessive moisture encourages the growth of mosses and mealy bugs. Overwatering the Jade plant may result in root damage Mold, as well as mealy bugs, can collect on the roots. Jade plants require just occasional irrigation. To correctly calculate the Jade plant’s water requirements, check the soil using a moisture testing tool.

Step 4 – Make use of a gentle soapy liquid solution.

Soapy water may help to keep dust mites as well as spider mites at bay. Fill the base of a spray bottle halfway with soap. Stir the spraying container after filling it with lukewarm water. Spray on the leaves. But don’t over soak the greens and harm them. The leaves must have a little sheen or gleam from the washing water. Do over a couple of months, or sometimes often if dust mites and spider mites are found. Use normal dish soap with this process.

Also Read: How Much Sunlight Does Peace Lily Need?

What are Mealybugs?

The mealybug is by far the most frequent bug of jade plants. Mealybugs produce white, cottony spots at the connections where leaves connect to stems. Its mouthparts penetrate plant tissues, allowing them to feast on living plants. Mealybugs produce a sticky fluid called honeydew while they eat. Its sticky honeydew is a perfect habitat for the germs of the fungus-sooty mold. Not just can mealybug infestations cause sap depletion in jade plants, but they also frequently result in a sooty fungus infestation.

Mealybugs as well as other jade plant insects are hard to eliminate since jade plants are hyper delicate to horticultural cleaners and lubricants. These pesticides might be excessively strong on the delicate leaves, causing further damage. Rather, mealybugs on jade plants should be removed using rubbing alcohol-soaked cotton swabs or Q-tips. Mealybugs, soft scale, or spider mites all are tiny insects that go undetected for long periods and therefore can readily hide in difficult-to-reach plant surfaces.

Recognition:

  • The plant’s fluffy cotton
  • Oval in form
  • Sucking sap from the plant
  • Brown or cream in color
  • Undeveloped ones have a waxy texture.
  • Mealybug males have wings.

Signs:

  • Leaf development that is deformed
  • Growth has been slowed.
  • The yellow leaves
  • Leaf decline
  • discovered on the underside of the leaves or cuttings

Also Read: How to Revive a Dying Pothos Plant?

How to get rid of mealybugs on jade plants?

Rubbing alcohol is inexpensive and widely available; some people prefer MaxTite Isopropyl Alcohol 70 percent since it is both inexpensive and effective. You may also discover that utilizing a spray bottle helps make the procedure much simpler.

Now take the rubbing alcohol and just spritz this on the jade plant. Please ensure you sneak into all difficult spots since that’s where mealybugs generally congregate. If you discover the infection soon enough, 1 course of treatment will suffice. Otherwise, many mealybugs will emerge in 2-3 days and at that point, you should spray your plant once.

Follow this method every several days till the mealybugs vanish! The good news is that rubbing alcohol is secure for plants and will not harm the houseplant.

Why do pests infest jade plants?

If bugs inhabit your jade plant, we must take the appropriate actions to eradicate them lest they control over and destroy them.

Overwatering

Most problems with jade plants are caused by overwatering. Jade plants cannot withstand overwatering since they dislike being damp and would react negatively in such situations. It can happen if you overwater your jade plant or even if you irrigate it without monitoring the humidity content in the soil.

Excessive moisture will arise when the pot’s draining arrangement is inadequate. Even though you water the plants properly, they will struggle if there is no appropriate drainage. The ground and base of your jade plant never breathe when it is left in wet soil for an extended length of time. As a result, the humid condition in the ground and roots can result in root rotting situations.

This contributes to insect outbreaks by providing an ideal habitat for insects to exploit and germs and fungus to thrive. If the gardener doesn’t really recognize and resolve the issue early on, there is a good risk that the plant may die. The things you need to do are as follows:

  • Make sure your pot has adequate drainage.
  • Make use of well-drained garden soil.
  • Feed the plant whenever the soil becomes dry.
  • Put the plant in a well-lit area that receives at least six hours of clear indirect sunlight every day.

Also Read: Overwatered Peace Lily: Signs & How to Revive Peace Lily

Excessive humidity

Jade plants don’t really like excessive humidity because when grown in excessive humidity environments, they are more prone to root rot as well as insect problems. Excessive humidity can develop naturally as a result of weather conditions. Should you reside near water, your house may well have a high moisture content. High moisture content can also be caused by watering jade plants.

If you overwater your jade plant, then the humidity level may increase. Since the water evaporates from the surface of the ground, the moisture content surrounding your plants rises.

Insects have a special ability for detecting high moisture regions; they require a wet environment to thrive, else their small bodies would dry over and perish. That’s why, should your jade plant live in these kinds of circumstances, it may invite pests.

Inadequate air circulation

Jade plants thrive in areas with good ventilation. It contributes to the reduction of humidity. Plants also prefer oxygenated soil mixes that allow water and air to circulate freely throughout. The water would rapidly dry up, reducing the likelihood of fungal development and insect assault. But, if this situation remains, germs will flourish and proliferate rapidly.

Conclusion

A mealybug or other bug infection is unpleasant, and therefore no plant owner or passionate gardener likes to struggle with any of it. The easiest approach to prevent mites is to inspect your houseplants on a routine basis and search for patterns or tiny bugs. With some of these instructions, you get access to all potential cures and also information on how to get clear of mealybugs and other pests.

Why Peace Lily Flower Turning Yellow, Brown or Black?

Peace lily, otherwise known as closet plants or Spathiphyllum, is a popular plant choice in homes and offices. As an indoor plant, they are easy to take care of and require little attention.

Peace lilies have lush, shiny green leaves and a flower that is hooded by a white leaf; the plant is a delight to look at. They have high aesthetic value and also clean the air of the room they are kept in.

While growing peace lilies is a reasonably easy task, some gardening mishaps can cause them to die or their leaves to turn yellow, brown or black. 

Peace Lily Flower Turning Yellow

Is the flower of your race, lily turning yellow? This could be due to some common mistakes like overwatering and some pro mistakes like light issues. So let’s look at the possible causes of peace lily turning yellow.

Healthy peace lily plants have shiny deep-green leaves, lance-shaped flowers, and a white leaf that hoods the sweet-smelling flower. However, some actions can make it unhealthy, leading to discolouration.

Also Read: How Much Sunlight Does Peace Lily Need?

#1 Overwatering

One common reason for yellow leaves of peace lily can be overwatering. On average, a peace lily needs to be watered every 7-10 days. 

However, water intake can be monitored from time to time by checking the soil; if it seems dry, water the plant; if not, then don’t. Overwatering one’s plant can lead to waterlogging, preventing a plant’s root from absorbing and transporting water, thus essentially killing them.

Water your peace lily once a week and always check the soil for dampness before watering.

#2 Underwatering

Not only overwatering but underwatering your peace lily can also cause the leaves to turn yellow. When the soil dries out, the plants do not get sufficient water to do photosynthesis and thus start to wilt.

Chronic underwatering can result in weak, yellow and discoloured leaves. Check the dampness of the soil and create a regular schedule for watering your plants.

Water your plants moderately and keep a close eye on them to understand their needs. Let the soil mix become dry but not too dry, and then water it.

#3 Excess minerals

An excessive presence of minerals in the soil can also be a cause of yellow leaves. For example, if you use water from a water softener, there are chances that it has too many minerals in it.

In such a case, prune off the yellow leaves and flush the soil with bottled or filtered water as this water has far fewer minerals. Then, if the problem continues, you can repot the peace lily in fresh soil. 

Constantly water your peace lily with filtered, bottled or rainwater to prevent the build-up of excess minerals. Also, do not overwater.

Also Read: Do Marigolds Keep Snakes Away?

#4 High Chemical content

High chemical presence in water can cause yellow leaves. Chemicals like chlorine and fluoride, when abundant in water given to plants, can lead to discolouration.

If you use tap water, let it sit for a while so that chlorine may be off-gas; however, this will not eliminate fluoride. The best option is to stick to bottled, filtered and rainwater for your plants.

#5 Ageing

As plants grow in age, their leaves naturally start to turn yellow, brown, discoloured and die. With age, plant leaves become weak and discoloured.

If your peace lily is old, prune off its lower yellow leaves and not stress it. Use a sharp tool to shear them off as blunt blades can cause damage and infections in plants.

Natural ageing cannot be reversed or improved on, so prune your leaves.

#6 Too much light

Indoor plants like peace lily can thrive indoors because they do not need too much light or water. However, too much or harsh sunlight can cause yellow leaves.

You can check if too much light is the cause of yellow leaves by looking at the veins. When the problem is light, the leaves turn yellow, but veins stay green.

Peace lilies need low-to-medium light and thus suffer when given too much light. Avoid bright, direct sunlight or fluorescent light. Light fluorescent light is enough for peace lilies.

#7 Cold air

Freezing temperatures can damage peace lilies. Peace lilies thrive in temperatures from the 65-85 degrees Fahrenheit range. However, temperatures below 45 degrees Fahrenheit can cause damage and yellowing of leaves.

Please do not keep your peace lily out when it starts to get too cold. Instead, keep the plant in even and chill-free temperatures.

#8 Hunger

Lack of nutrients in the soil or water can cause yellowing leaves as they leave the plant hungry. Also, a lack of minerals such as iron or magnesium can cause yellow leaves as they must stay green.

Fertilise your peace lily once or twice a year to ensure that the mineral content is adequate. Remember, too much or too little of anything is harmful.

Use a high-quality potting mix that is high in organic mineral levels. Yellow leaves do not turn green again except when low mineral leaves cause yellowing, so don’t worry there’s still hope. 

#9 Pests

Pests like spider mite, heavy mealybug or aphid infestation are unhealthy for peace lilies and turn their leaves yellow. Therefore, it is uncommon for healthy peace lilies to be infested by them.

It is most likely that pests grew simultaneously with another problem: overwatering, poor placement, etc. They get rid of pests by washing or wiping them; if they persist, use neem oil insecticide.

#10 Diseases

Funguses or parasites can turn a peace lily’s foliage yellow. They can be prevented by taking good care of the plant; however, throwing away your plant is the best option if they show up.

Peace lily flower turning brown

Peace lilies are beautiful plants that can be easily maintained; however, if you see the leaves turning green, it is time to review your plant care steps.

A healthy peace lily has lush, green leaves and white flowers hoods by a resplendent white leaf. Brown leaves are a sign that there are some issues. Reasons for brown leaves

Water problems

Overwatering or underwatering are the most common reasons for brown leaves. Too much water will cause waterlogging, and underwatering will wilt the plant.

Irrigation problems can be avoided by keeping a regular water schedule and keeping a check on the dampness of the soil.

Also Read: How Long Can a Peace Lily Go Without Water?

Humidity

Peace lilies thrive in warm, wet climates, and thus humidity is necessary for them. A lack of moisture can be the reason for its foliage turning brown.

You can counter this by putting pebbles in a large saucer to trap moisture. This is especially important if you live in dry areas.

Fertiliser 

Excessive use of fertiliser is another cause of brown leaves. Peace lilies do not need much fertiliser. A few times a year is enough. However, excessive fertiliser will increase the mineral content and lead to brownness.

Salt

Similar to fertiliser, high salt content will also spoil a peace lily’s leaves. If you feel that the water is high in salt content, use bottled or filtered water.

Also Read: How to Revive a Dying Pothos Plant?

Why peace lily flower turning black?

Black discolouration on the leaves of a peace lily can be due to three main reasons, namely-

Too much or too little water

When too much or too little water is given to the peace lily, its leaves turn yellow, then brown and finally black. Therefore, checking the issue and rectifying it by adequately watering the plant is best.

Spruce off the black leaves and watering habits.

Temperature change

An extreme temperature exposure, whether too high or too low, will cause discolouration that gets black. So keep your peace lily indoors and maintain an even temperature.

Fungal infection

Fungal infection called Phytophthora or aerial blight turns the foliage black. To prevent its spread, you will need to keep water far from the leaves.

You may also need to treat both the soil and the leaves with a fungicide, preferably an organic one. This could be cumbersome so if you are a novice, consider getting a new plant.

The Bloom

Apart from the foliage turning black, another unhealthy situation is which the spadix or the spike-shaped white flower turns black. This protrusion is known as bloom and has minute flowers in it.

The bloom may also turn black, and its cause will depend on its age. If the bloom is a few weeks old and gets black, it shows that the bloom is in decline, a natural process in peace lilies. 

You can check if the bloom is declining by looking at the leaves; if they seem green and healthy, then there’s no issue. Next, get rid of the wilted bloom by cutting it off.

If the bloom is very fresh and blackening, then it is a sign of stress. If your leaves also show discolouration, there are chances that you are overwatering the plant. Check on the soil before watering.

Also Read: Does Swiss Chard Grow Back After Cutting?

Tips for maintaining your peace lily

Here are some tips that will make it easy for you to take care of your peace lily-

  • Have a watering schedule
  • Always check the dampness of the soil before watering
  • Do not overwater or underwater
  • Keep away from harsh light
  • Peace lilies do not enjoy low temperatures
  • Maintain an even temperature within the house
  • Fertilise the plant 2-3 times a year
  • Do not over-fertilise
  • Use bottled or filtered to water them
  • Water high in floured, chlorine and salt is not suitable for them
  • Wipe leaves with soapy water regularly to prevent pests
  • Wipe leaves with soapy water
  • Try to keep moisture trapped for them 

Conclusion 

Peace lilies are house plants that can be quickly taken care of. However, some unhealthy practices can cause the leaves to turn yellow, brown or black. 

Actions such as overwatering, underwatering, over-fertilisation, excessive light, high salt content, fluoride, chlorine, fungal infections etc., can damage the peace lilies. Another inevitable cause is ageing.

Take good care of your peace lily by following the steps mentioned above.

Does Swiss Chard Grow Back After Cutting?

Swiss chard is a strong, beautiful plant that embraces scorching summertime and harsh winters. It’s also prized for its crackling, vitamin-rich greens, and asparagus-like spines. Does swiss chard grow back after cutting? The answer simply is yes. You may eat organic Swiss chard from the crop for up to 2 hours if you cut the greens properly.

Understand how to produce Swiss chard, often known as “chard,” a plant with vivid, multicolored stems. This nutritious vegetable thrives in both chilly and warm climates, and its mellow flavor adds nourishment and color to salads, spaghetti, pizzas, quesadillas, sandwiches, and other dishes. Here’s how to cultivate Swiss chard within your yard and collect it!

Also Read: How to Grow Chinese Cabbage from Cuttings?

Discussing Swiss chard

The stems as well as greens of Swiss chard, a species of the beet group, can be consumed cooked or uncooked. Leaf beet, silverbeet, seakale beet,  as well as spinach beet are all synonyms for chard. Swiss chard is available in a variety of colors, including pink, orange, yellow, red, as well as white, and is most recognized because of its brilliant and colorful stems.

Chard is usually cultivated like a cool-season plant since it thrives fast and efficiently in the milder springtime and autumn weather, but it can also tolerate higher temperatures. Although chard’s development slows mostly in summertime, its superior thermal endurance makes this a wonderful salad vegetable to produce whenever the weather overheats for the rest.

Chard is a healthy food that contains a lot of vitamins A, C, plus K. Which doesn’t have the unpleasant flavor of many other veggies, and this is an excellent alternative for spinach as well as kale if you don’t like those superfoods.

In addition to its many benefits as a gardening veggie, chard is indeed a wonderful tasty decorative crop to incorporate into your landscape! Its array of colors is stunning! You may also use chard alone or combined with blossoms in a jar or arrangement. Why should blossoms be the only ones having a good time?

Also Read: How to Grow Pointed Gourds at Home?

Step to Grow Swiss Chard

Sow the Seeds

Even though Swiss chard may flourish in inferior soil it flourishes when a bit of blood meal gets mixed into the ground. Initially in the spring once soil levels somewhere between 50 and 65 degrees, sow seeds. Make shallow sets that are 18″ apart. Throughout the rows, space the plants 2″ apart and top with 1/2″ of dirt. Make sure it is well-watered.

Seedlings should be thinned out.

In around a week, Swiss chard would then start to grow. Thin their seedlings to one planting per 9″ to 12″ when they are approximately 2″ tall. Seedlings can be removed by snipping these off at the ground level using scissors.

Cultivate Swiss Chard

Provide Swiss chard a lift with blood meal within that middle of the growing season. To protect the blood meal against wiping away mostly in rain, bury it with dirt. To keep the leaves from turning bitter, make sure they have enough water. A thick layer of compost will assist to keep moisture in the soil.

Set transplants whenever the temperature is still hot to ensure optimum development. Plant your chard 12 to 18 ” away, however in a well-fertilized garden bed, you might well be fortunate to get them as near as 10 inches off from each other. The petals may seem weak after transplant, but they will quickly recover! Chard is simple to cultivate from seed. Seed germination could be sped up with a quick pre-soak.

Also Read: How to Grow Radish Microgreens?

Pruning

Pruning your Swiss chard will only be necessary if it attempts to bolt to seeds. Keep only a couple of stalks and slice the remainder of its plant straight to 1 inch above the ground surface at that moment. Because as the plant fixes its effort on developing new ones, the old leaves assist it to undergo photosynthesis.

It doesn’t always inhibit bolting, however, and this can slow things down, allowing the plant to live longer. However, much pruning is done based on harvesting operations or to eliminate defective leaves. Typically, the outermost leaflets and stalks get picked first, allowing the interior stalks to function as photosynthesizers.

Propagation

Swiss chard grows from seeds, and all other techniques are unable to be successful. Seeds could be started inside or sown straight onto beds. Select high-quality seeds from a reputable provider. When the last winter period has expired, the seedlings should emerge within 1 to 2 weeks and might even be planted outdoors. It is best to acclimatize the saplings to the outdoors for a few hours each day before transferring them into the soil or a pot.

Also Read: How to Prevent: Mold on Microgreens?

Harvesting the Swiss Chard

Swiss chard is completely grown around 3 months after sowing. Chard is a “cut-and-come-again” plant, this indicates that once the exterior leaves are plucked, the interior leaves will restore them. Resist chopping into the center developing bud while harvesting leaflets, since this may lead the plant to cease generating.

When will the Chards be suitable to harvest?

Chard could be collected while the greens are immature and delicate, just under 4 inches (10 cm) in length, or beyond maturity. Once you’ve started harvesting Swiss chard, it may be harvested indefinitely until winter.

Swiss chard greens can be snipped while they are quite tiny for a refreshing touch to a mixed salad. Bigger chard leaves could be chopped and utilized for stir-fry recipes. Chard will generate excessive greens as much as it is pruned. Stalks or ribs could also be prepared and consumed in the same way as asparagus is.

Chard will thrive in areas where warm weather conditions are constantly in the 80sF (26°+C) and also can survive cold temperatures of 30sF (-0°C). When chard bolts then start to blossom in hot conditions, remove the blooms stalk quickly and the crop will generate additional leaves.

Cultivate chard beneath a plastic tube or in a chilly structure in cooler locations. Chard may be kept from chilling in a cold box by wrapping plants using straw/hay. Chard that has been overwintered can provide you with a springtime crop.

What is the best way to harvest chard?

For the greatest quality, cut Swiss chard very near to lunchtime if feasible. Use gardening scissors or perhaps a serrated kitchen knife to cut the Chards. Chop chard leaf after leaf—cut the exterior leaf first to enable the interior leaflets to expand higher and cut the entire plant 1 inch (2.5 cm) well above ground. In any case, the plant will continue to grow new leaves.

Soil frequently adheres to the bent stalks of chard. To wash them, fill a bowl halfway using lukewarm water then swirl them gently, and remove the leaves & place them inside a strainer to dry; continue if soil persists Before storage, allow the greens to dry completely or brush them thoroughly with a napkin or paper towel. When eating raw or cooked leaves, remove any midrib from bigger leaves. Big leaves are usually finest boiled down and diced like spinach or utilized in stews and soups, salads, or pasta.

How should chard be stored?

Swiss chard should be stored at 32°-40°F (0°-5°C) with 95 % humidity levels. Refrigerate the greens in a zippered plastic container in the veggie crisper area. Refrigerated chard can stay for around 10 days. When chard is kept too chilly or too extended, it develops brown patches mostly on the midrib as well as the leaves shrivel up yellow.

How Much Sunlight Does Peace Lily Need?

Anyone who loves to build a backyard filled up with their favourite house plants would also recognize a spoon shaped, single petaled flower clubbed with large leaves. You guessed it right! We are talking about peace lilies.

Peace lilies are known to enhance the beauty of whichever place they are kept in, and belonging to tropical regions, they require conditions familiar to the region, in order to thrive.

If you have peace lilies growing in your backyard, then you might face a lot of issues and disturbances before yielding the best plant. How much sunlight does peace lily need? Will peace lilies survive without sunlight? Do peace lilies require water? These and so many more questions might pop up in your mind when entrusted with the responsibility of growing peace lilies.

However, we assure you, it is not that difficult as it sounds. In the preceding article, we would be directing our attention primarily to the light requirements of peace lilies. In our journey, we would also gain some knowledge about what peace lilies are and how you can grow and maintain them at your home.

Scroll through to end your quest of finding everything about peace lilies.

Related: How Long Can a Peace Lily Go Without Water?

Know your peace lily

Scientifically known as Spathiphyllum, peace lilies are native to American and Asian tropical regions. They are also famously known as spath, and are usually available by this name commercially.

These evergreen plants have lush green leaves which are about 12-65 cm long and 3-25 cm wide.

Since the plant is evergreen, it does not pose special demands for large amounts of water or sunlight regularly.

According to a study by NASA, peace lilies are responsible for cleaning specific gaseous contaminants from the environment they are placed in, like formaldehyde and benzene.

A surprising fact is that peace lilies do not really belong to the family of lilies and are therefore mildly toxic to ingestion by humans and animals, unlike true lilies which are highly poisonous.

Cats and some other animals can suffer from acute kidney failure if they consume a leaf or flower of peace lily.

Now that we have had an idea about peace lilies, let us jump to the most important question surrounding the light requirements of the plant.

Meeting the light requirements of a peace lily plant

As we have seen earlier, due to the nature and origin of the peace lily plant, they do not require excess sunlight. But, this little piece of information is not really something that we have been looking for, right?

We need in depth information about how much light they require, why is it so, and what are the possible sources. Let us dive in to know more!

Also Read: Overwatered Peace Lily: How to Revive Peace Lily

How Much Sunlight Does Peace Lily Need?

Sources of light indoors

If you happen to place your peace lilies indoors for growing purposes, chances are that it will receive indirect sunlight for most part of its life, while the rest of the requirements would be met by artificial indoor plant light sources. So, how to take care of your peace lily, if it is placed indoors?

The foremost important rule is to try and let the plant receive as much indirect sunlight as it can. For this purpose, you can place the plant near a south facing window, where the rays of sun fall directly into a spectrum of light. This kind of light will provide maximum benefit to your peace lily plant indoors.

Note that if your house does not have a south facing window, you can always opt for a north facing window, as the light falling from the direct is less intense but still useful for the plant. Do not worry if your windows do not catch a direct pathway of sunlight. Your plants will gain the maximum benefit when placed near windows, since the heat and effect there would be more intense, even if the rays do not fall directly.

If, at any point of time, you feel that your plant is not able to achieve maximum light from the window, you might want to look at other factors that are key in increasing, decreasing, or modifying the intensity of light.

Some of them are, the cleanliness of the window, colour of the wall, and placement and positioning of the mirrors. Some of the high school physics lessons go into understanding why these factors are important, how they influence light intensity, and how to select them.

Light coloured walls (preferably white or cream) and mirrors reflect the incoming sunlight and light up the potted plant placed right in front of them. This would not work if you place your plant in front of a dark coloured wall with no mirrors. Further, you can make use of the simple shadow test to know if your plant is achieving the appropriate proportion of light indoors or not.

Also Read: How to Revive a Dying Pothos Plant?

Sources of light outdoors

If you are placing peace lilies or any other plant outdoors, then there is only one source of light left, sunlight, probably direct. Anyway, here is what to do if you have decided to plant peace lilies outdoors. Primarily, place it somewhere where the sunlight does not fall directly throughout the day. You can select a sheltered porch, a patio, or a spot under your favourite tree, whatever you desire.

Make sure that you place it somewhere you have constant access and flexibility to change the directions and positions. As and when the night starts to set in, it is preferred to take the plants indoors. Peace lilies cannot tolerate temperatures below 60 degrees fahrenheit, therefore you should take special care of this when you place it outdoors.

Placing peace lilies outdoors cannot stop it from getting influenced by the weather and seasonal changes that take place  throughout the year. Let us look at some specific seasonal considerations to grow peace lilies outside in the open.

Spring and Summer

During the spring and summer seasons, peace lilies do well when placed in low lighting conditions- however they do not thrive in those conditions. If you want the leaves, flowers, and the overall plant to achieve its maximum and best growth, it is ideal to move the light into a moderate to bright indirect sunlight receiving condition. It would help your plant bloom in no time.

If you feel that indoors, near the window is the perfect place for your plant to achieve the ideal amount of sunlight, then you can shift the plant anytime you want, for its betterment.

Also Read: Do Marigolds Keep Snakes Away?

Winter and Fall

As the seasons of autumn and winter kick in, peace lilies switch their demands from bright sunlight to low and moderate sunlight. Since it is difficult to predict the amount of sunlight in winters, it is preferable if you install artificial lights and make use of them for fulfilling the light requirements of your peace lily plant.

You can begin by installing a light fixture with two fluorescent bulbs hanging 10 to 12 inches above the plant. Make sure to set the timer on your light fixture such that your plant gets a steady amount of 16 to 18 hours of artificial light on a daily basis.

If the windows are giving excess sunlight, make sure to cover those with sheer and a light material curtain. Similarly, if placed outdoors, you can give your plant enough shade if the sun decides to bless the earth in that weather.

When the day reaches its brightest part, you can perform the shadow test with your hand to get shadows that are either too blurry or too edgy, according to the light that the plant receives. Make sure the former shadow on the wall or a sturdy surface is somewhere between the two.

Adjust the plant according to the amount of sunlight it achieves. This way you’d be able to test your peace lily for adequate sunlight in the most accurate and convenient way possible.

Also Read: Why Are the Leaves on My Christmas Cactus Drooping Leaves?

Do all types of peace lilies require the same amount of light?

Peace lilies come in various shapes and sizes. It would not be wrong to say that the light requirements differ for each peace lily. Below is a list of four of the most common species of peace lilies that are grown as houseplants, with the lighting requirements that each prefers.

You can check the light requirement of your plant according to the kind of peace lily you are growing.

Domino

The most commonly available, domino peace lily thrives and seeks out artificial light sources like fluorescent light. In short, it does not require direct sunlight and likes to stay away from it for most part of the day.

Office buildings or entrances are the ideal locations for placing Domino peace lilies for receiving adequate light, artificial or otherwise.

If placed indoors, Domino peace lilies do well in bright indirect sunlight coming from windows or window ledge. This is if the window is placed in the north eastern direction.

However, if placed in western or southern direction windows, the plants don’t do well in the falling indirect sunlight. If the houseplant is kept 8 to 10 inches away from the window or the window is sheltered appropriately, then the plant is not affected as such.

Overall, bright and indirect light will yield more flowers in a domino peace lily than no light.

Mauna Loa

Like its counterparts, maunaloa peace lily will yield blooming flowers under moderate light. In too low or severely high light, the plant either gets no flowers or gets bleached. West and east facing windows should be preferred for keeping maunaloa peace lilies.

Sweet Pablo

Locate a perfect spot near the window and place your sweet pablo peace lily variety on that spot. Keep it in a well lit area, away from direct sunlight.

Sensation

Low to moderate light are the most appropriate lighting conditions that supports the growth of sensation peace lily plants. Keep it away from dark areas, and relocate it at a place that receives bright and indirect sunlight. 

It is advised to keep the plant away from direct sunlight, since they can cause specific harm to its sensitive leaves.

What happens when the plant gets inappropriate light?

There might be times when your peace lily is not able to get adequate sunlight. How will you know? Here are two prominent symptoms that would help you mark lighting abnormalities within your plant.

Scarce flowers

Low light conditions do not provide enough impetus for the plants to bloom, creating a condition of closet plants.

Brown leaves

Too much light can cause the foliage of peace lilies to turn brown. This is a sign of leaf burn which results from the scorching heat of direct sunlight.

Conclusion

Usually grown as houseplants, peace lilies can sometimes fail to attain the adequate nutrition and survival necessities which would have been present otherwise. Nevertheless, if one really desires to grow the perfect peace lily, then they should be ready to go an extra mile for the same.

The aforementioned tips and information have been gathered from empirical research studies. If followed rightfully, the effort will not go in vain.

Happy gardening!

How to Grow Radish Microgreens?

Radish microgreens are one of the most nutritious, healthy and tasty microgreens. They are a very popular microgreen plant that can be quickly grown and enjoyed at home.

Radish microgreens are grown from the same seed that produces the radish bulb or the red, conventional radishes we are used to. Microgreens have a slightly different method of growth.

 For nutritionists, microgreens are loved for the plethora of micronutrients and other essential vitamins that they provide; chefs like them for the crunchy texture and spicy flavour they add to a dish, and plant enthusiasts love them for they are easy to grow.

Radish microgreens are easy to grow and take care of, making them a good candidate for first-time planters. Their seeds are easy to sow, raise and harvest. I’m here to tell you how to grow radish microgreens. 

Also Read: Mold on Microgreens: How to Prevent them?

Benefits of Radish Microgreens

For our health, radish microgreens are a boon. They carry lots of essential nutrients in adequate quantities. Radish microgreens belong to the Brassicaceae family within microgreens.

Radish microgreens seeds sprout to grow microgreens that are tasty, healthy and nutritious.

For health enthusiasts, the vitamin value within these microgreens is the highlight, so let’s first have a look at its nutritional value-

#1 Vitamin B6 and Folate

Radish microgreens contain vitamin B6 and folate, which helps improve the cardiovascular system by breaking down homocysteine which deposits fats in the blood vessels.

The abundance of fat in the blood vessels can cause heart issues and brain haemorrhages.

#2 Cancer deterrent

Radish microgreens are an excellent cancer deterrent food because of the high levels of glucosinolate present in them. 

Glucosinolate is high in antioxidants and wards off bacterial, viral and fungal infections. 

#3 Good for weight loss

Due to the low-calorie value and high fiber content, radish microgreens are an excellent choice for weight loss. Radish microgreens are high in vitamin C that burns fat, and have a fulfilling effect on the stomach.

Add these in a salad or a sandwich and increase your portion size without substantially raising the calorie intake.

#4 Good for the skin

Radish microgreens also have sound effects on the skin. High vitamin C content in these microgreens brightens our skin, dulled by stress, age, pollution, sun, and more.

#5 Good for diabetics

A research study showed that radish microgreens increase glucose uptake of cells by 25-44%. This increase in glucose uptake prevents high sugar levels and helps in controlling sugar.

Also Read: How to Grow Pointed Gourds at Home?

Radish Microgreens V/S Radish Bulb

Both the microgreens and the bulb are grown from the same radish seeds. The nutritional values of the two are also almost the same; they differ only in terms of texture, flavour and variety.

While the bulb is chewy and big, the microgreens are tiny, crunchy, and have a spicy, peppery- taste. The microgreens present a new way to add nutrients with a varied taste and texture.

Unlike traditional radish, microgreens can be used in sales, sandwiches, and toast without the overpowering taste of radish.

How to Harvest Radish Microgreens?

Growing radish microgreens is a simple and easy process; thus, you can adeptly harvest radish microgreens irrespective of your experience in growing plants.

Radish microgreens are grown from the same seeds that produce the red radish bulb. Here are the steps you should take to grow radish microgreens within ten days.

Step 1

Choose a planting tray. You can use a plastic or glass potting tray or even Tupperware. Then, add a premium toting mix to the tray. Once decided, make holes at the bottom of the potting tray to allow water to be drawn up from below. 

Make the soil even and compact both at the bottom and top of the potting tray.

Step 2

Using a spraying bottle to wet the soil. Allow the water to be soaked, and repeat the process. If the ground gets uneven at places, use your hands to press it down gently and even it up.

Step 3

The Next step is to sow the seeds. For radishes, one needs to plant about ten seeds per square inch; thus, for a 38 in² planting tree, one would require about 4.5 g of the seed. You can take the help of online calculators to know the number of seeds you should sow.

Using something like a shaker to sow the seeds will help in their even distribution, and thus healthier growth as each would have space to grow.

Step 4

Sprinkle the seeds in circles around the planting tray and try to spray them as evenly as possible. Once done, use your fingers to spread them away gently. 

The seeds don’t need to be spaced perfectly; once the seeds start to grow, empty areas would be filled up independently.

Step 5

Use the spray bottle to water the seeds. Do not use too much water and ensure that the seeds don’t fly away. Water will help the seeds in settling down in the tray.


Step 6

Cover the tray. Covering the microgreen seeds to prevent light from falling on them is essential to growing microgreens. It is necessary to weigh down and blackout the seeds to ensure that they thrive.


Step 7

Leave the seeds for 2-3 days. The seeds will germinate and grow on their own; the cover on top of them will help retain moisture for this period. 


Step 8

On the second or third day (preferably the third), remove the lid and check on the seeds. If the germination rate looks good and the roots are growing, you can allow them to receive light and increase.

However, if the germination rate doesn’t look good and the seedlings are tiny and are not adequately grown, check if the soil is dry, water it and cover it again for some time.


Step 9

Once the seeds germinate, it is time for them to receive light. At this point, it is best to let them receive as much light as possible, be it sunlight or artificial light in the form of LED, tube light and more.

If the soil looks dry, spray some water to wet the upper layer. Do not water the seeds anymore after this point on.


Step 10

Harvest the microgreens. After 8-10 days, the radish microgreens will be ready to harvest. When their length reaches 2.5 to 3 inches, you can harvest them.

To harvest them, tip the tray at a 45-degree angle and use a sharp knife or scissor to cut them off right above the soil surface. 

Make sure that the soil surface isn’t disturbed. If some get split, just remove it from the microgreens by gently wiping them off. Cut off the amount you need at that time and let the others grow in the sun.

Also Read: How to Grow Chinese Cabbage from Cuttings?

How to Grow Radish Microgreens Hydroponically?

Growing crops hydroponically means that plants are grown without soil, using the mineral nutrient solution as a substitute. The pH level of water plays a vital role in this subset of horticulture.

Hydroponic farming uses something like a growing pad enriched with all the essential nutrients that are otherwise found in soil.

Here’s how to grow radish microgreens hydroponically

Step 1

Balance the pH of the water you will use to water the seeds. The best pH is 6; however, anywhere between 5.5 to 6.5 would do.

Step 2

Prep the trays by pouring two cups of pH balanced water into them. Ensure that the growing pad is saturated in water and move the water around gently to spread it evenly.


Step 3

Spread out the seeds on the saturated growing pad. Sprinkle them evenly or use a shaker. Since radish seeds are larger seeds, use about a quarter of a cup of seeds.


Step 4

Once seeds are spread, wet the growing pad with water and cover. Remember, a blackout is essential for roots to grow properly. Mist the pad every 12 hours.


Step 5

Uncover the tray after 4-5 days when germination is visible. Let it sit under the sun or bright artificial light. 


Step 6

Check up on the seeds daily for a week, mist water when needed and provide ample light.

Step 7

Harvest the greens and enjoy!

Both the traditional method of using soil and the hydroponic method of using a growing pad grow lush, beautiful and tasty radish microgreens. Follow our steps and grow these nutritious greens now.

How to Grow Pointed Gourds at Home?

The pointed gourd, like cucumbers and squash, is a vine. It’s high in minerals, as well as vitamins and this is commonly found in stews, soups, curries, even desserts. This vine is often recognized for its potential to decrease sugar levels as well as overall cholesterol levels among humans. If all of the information has piqued your interest, take a peek at Growing Pointed Gourd at Home for more information.

One of the healthful veggies that may be simply produced in the yard is the pointed gourd. Its seed propagation procedure is the simplest and most critical stage in growing Pointed Gourd. We use already-grown seedlings to assist young plants in their development so that they can grow quickly. Its natal location has given it the name Parwal. This plant is a member of the Cucurbitaceae family of gourds. It also has a similar appearance to the veggie ivy gourd, however, it is larger.

How to Grow Pointed Gourd (Parwal)?

Cultivation

The optimal development of the pointed gourd needs a somewhat warmer and humid atmosphere. The plant remains dormant throughout the wintertime and is vulnerable to waterlogging, necessitating the use of well-drained sandy loam ground

Just at the stage of sowing, you should have a 9:1 female to male plant proportion. Because the pointed gourd is a dioecious species, just one species for each plant is chosen. As a result, if all of the seedlings in one’s yard are of the same type, your overall harvest will be nil. As a strategy, maintaining the sex ratio is critical for achieving optimum results.

Also Read: How to Grow Chinese Cabbage from Cuttings?

Soil Conditions

Light soils are required for growing pointed gourds. It would be unable to develop in dense soils. Soils ideal for cultivating Pointed gourds include loamy and clay soils, which are light. Furthermore, the PH level of the soil must be in the spectrum of 6.0 to 6.5.

Climate Conditions

A pointed gourd thrives in tropical and temperate climates where it could get enough sunshine. The development of pointed gourds is well adapted to both humid as well as hot conditions. Throughout that period, the temperature should be around 30-35 degrees Celsius. Regularly, the preferred site must get 5-6 hours of bright sunlight.

During the wintertime, the vining plant goes dormant. As a result, you must grow and collect pointed gourds well before the temperature drops. If you want to harvest the produce that year, then you must plant after the risk of a cold has passed.

Watering

Water each 3-5 days throughout the early stages of development. Raise the frequency to every other day after the plant begins to bloom and produce. Make sure the ground is equally wet yet not soggy.

Support

The pointed gourd is a vine that has to be supported to develop and grow. Construct a trellis or set up a pole or structure on the growing spot. Whenever the vines make the peak of the trellis frame, prune or gently pinch them. This should encourage the plant to concentrate its efforts on producing more blooms and fruits.

Natural Fertilizers

  • Before growing a pointed gourd, put cow dung fertilizer into the ground.
  • Conversely, you can apply the 10-10-10 adjusted liquid fertilizer periodically.
  • Using an all-purpose fertilizer at the transplantation phase gives the plants an extra push.
  • If the crop exhibits indications of weakening, you can fertilize it once again. One maybe two occasions a year, apply a side coating of well-rotted old manure to the plant.

Also Read: Mold on Microgreens: How to Prevent & Get Rid of Them

Diseases and Pests

  • Blister beetles or even Red bitter beetles seem to be some of the very widespread pests that attack pointed gourd plants. Water could be sprayed on the vegetation to control the former. In between periods of February and April, the red bitter beetle attacks the vegetation.
  • Root-knot Nematode, Mosaic, Fruit Rot, or Downy Mildew seem to be the most common diseases that afflict pointed gourd plantations.

Step-By-Step Guide

Cuttings, seeds, as well as root suckers all can be used to grow pointed gourds. You may implement the instructions outlined following while working with seeds:

  • To increase the likelihood of propagation, soak those seeds overnight upon obtaining those from a mature pointed gourd fruit or perhaps a farmers market.
  • After that, you must immediately spread these seeds in the yard.
  • Once the new plants develop 5-6 leaves, the poor ones will need to be trimmed out.
  • After 2-3 weeks following sowing, budding seedlings are ready for transplantation.

If you’re propagating from cutting, you’ll need 5-6 inches of vine cutting to get started. Tuberous roots will need to be pulled out in the springtime to propagate the crop from root suckers. These will need to be split and replanted. People with the limited room can cultivate pointed gourds using pots simply implementing the methods outlined below:

  • First and foremost, you’ll require a 16-20 inch pot containing enough drainage openings When the plant has grown to its full size, you may transfer it over to a wider pot
  • Potting must be done using well-draining sandy plus loamy soil which has been appropriately blended with old compost or manure
  • You must put the plant somewhere that gets enough sunshine.
  • While this soil must be maintained wet, you should avoid allowing it to get soggy.
  • A string or trellis could be used to hold the vine and allow it to make the most of the available vertical space.

How to Propagate a Pointed Gourd?

Root suckers or plant cuttings can be used to grow the pointed gourd. Seed propagation might be an option, however, the odds of germination are significantly decreased. When developing the vine, keep a minimum spacing of 1.5-2 meters between every pointed gourd vine. Let’s have a glance at how to plant the pointed gourd presently:

  • Tuberous roots must be dug from the ground in the springtime for root growth. They’ll need to be put straight into the ground and irrigated daily. Keep a male-to-female seed proportion of 1:9 to improve the probability of blossoming.
  • When cutting vines, you must first remove a 1-2 foot vine from one plant that is at most 1-2 years of age. There should be 8-10 nodes within that cutting. After that, you must infest all of the vine’s leaves but 2-3. The cutting would need to be put in a container with a 30 percent coding fertilizer and 70 percent soil combination. In between periods of February, and March you’ll need to moisten the pot then transfer this into the yard bed.

What is the best way to harvest a pointed gourd?

In most cases, after planting new vines and transferring these around February, the vine begins producing around 120-140 days that continue until September. These are available to harvest 15-18 days following pollination. From July to October, all fruits should be ripe.

Between these dates, harvesting ought to have taken place. Since fully matured fruits are unfit for consumption. Before plants hit maximum maturity, they must be harvested. As a result, the veggie Pointed gourd must be picked before it matures into fruits.

Also Read this: Can you grow zucchini from scraps?

Process of Yielding

Development management, nutritional management, fertilizer management, as well as water management all have a role in the yield of the pointed gourd. The yield is estimated to reach 15 to 20 tonnes per acre.

Maintenance Tips for Pointed Gourd Plants

The primary measures to follow during harvesting are nutritional care, fertilizer management, as well as water productivity. This should ensure that the crop grows well.

Post-Harvest Care

After harvest, cleanse the pointed gourd veggies. Before using them, make sure they’re clean.

Conclusion:

In terms of nutritional veggies, pointed gourd might be an excellent choice in home gardening. Parwal is a famous Indian vegetable that is cultivated virtually everywhere. It may very well benefit everyone in the house if it has been adequately grown. Several different types of pointed gourds generate a lot of fruit.