How to Revive a Dying Pothos Plant?

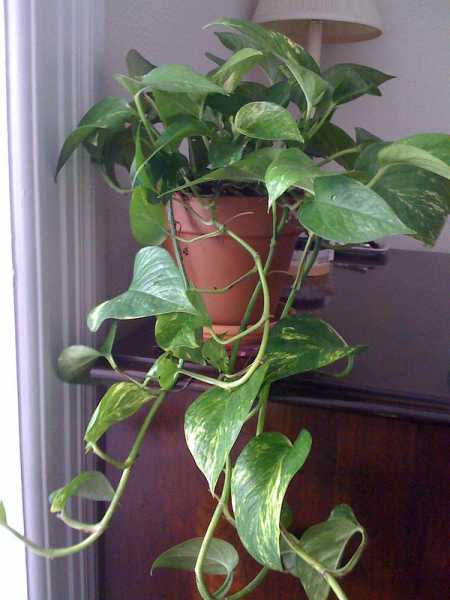
Pothos is one of the most common houseplants that are famous for the ease it provides to its caretaker while growing. However, nothing comes without a price.

It really doesn’t matter if your pothos is forgiving or not, because once you start distressing it, it would give up one day and decide to terminate its life.

Perhaps, this is why you are here, to ask “how to revive a dying pothos plant.” You are at the right place! In the preceding article, you will be informed about the signs that tell you if the pothos is dying or not, along with tips to revive your pothos plant. 

How to Tell if Pothos is Dying?

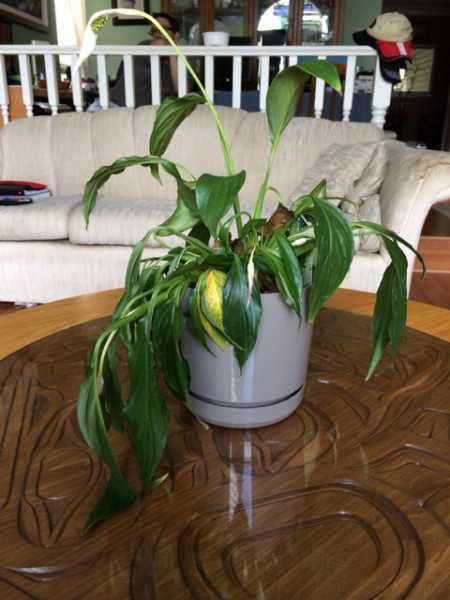
A dying pothos will give you numerous signals before it finally takes off. All you have to do is, catch those signs rightfully and begin doing the needful. Let us have a look at the most common symptoms of a dying money plant: 

  • The very first is dropping or limp leaves. When the leaves start to droop down, it is a red flag.
  • White spots on your pothos plant leaves indicate the presence of fungal diseases, which have the capacity to end your plant.
  • Water stress, low light, and over-fertilization can result in a dramatic yellowing of leaves, which is fatal for many pothos, if not treated timely.
  • Brown leaves indicate low humidity in the environment, and the plants cannot tolerate that, resulting in their death.
  • Pests and overwatering can get the leaves of your pothos plant to curl, something that is harmful to the health of your plant. 

Also Read: How Long Can a Peace Lily Go Without Water?

Reasons of dying pothos plant 

A lot of signs that we saw above stems from reasons that are mutual between these symptoms. Understanding the logic can not only help us prevent further damage, but would also straitjacket us from performing such activities in the future. 

Overwatering 

If we are to list the reasons for pothos dying, overwatering should undoubtedly top the list. Here’s why-

Excess water in the pothos plant tends to turn the leaves brown while also causing root rot. Next, if you want to evaporate the water, you would expose it to light which can promote the drooping of leaves.

That is how this deadly loop is created. 

Underwatering

You might think, okay, if not overwatering, then maybe underwatering can do the trick. Well, well, this is not how it works.

If you are devoid of your pothos plant of adequate water and moisture supply, you are taking the most critical source of nutrition away from your plant. The plant does not tolerate this for long, and it dies.

Also Read: Overwatered Peace Lily: Signs & How to Revive Peace Lily

Lighting issues

Pothos can grow without light, but they cannot thrive without it. If you alienate your plant from sunlight or any other source of light for a considerably huge amount of time, then it would reflect in their stunted growth, lack of food and nutrition, and leggy growth. 

These reasons provide enough impetus for a pothos plant to die. 

Improper Drainage

This problem is very well linked to our very first issue of overwatering. If you allow the plant to sit in excess water for more significant periods of time, then it would create no space for aeration and a foul odor.

It can result in root rot, wet and soggy soil, and finally, the death of your plants. 

What else?

These reasons are not the only ones that can contribute to fatal conditions for your plant. Following unhealthy habits like over-fertilizing the plants, not treating fungal infections and pests timely, providing an improper potting mixture, and lack of maintenance are also famous for encouraging the ill health of your pothos plant. 

Check this out: Do Marigolds Keep Snakes Away?

How to revive a devil’s ivy? 

We know you might be overwhelmed to look at all those dangerous reasons and signs that indicate that your pothos plant is dying, but what if we gave you perfect solutions for your problems? That’s right. Look at these big five solutions to revive your devil’s ivy houseplant. 

Without further ado, let us begin!

Correcting the watering techniques

We saw how both overwatering and underwatering could be a problem for your pothos plant. So, how to know the correct watering technique and amount. You can solve the problems of underwatering and overwatering independently. 

If your plant is overwatered, prune the damaged leaves, and stop watering for a few days, or at least until the soil becomes arid and dry again. You can also prevent overwatering by watering only when the soil seems dry and drain out the excess water immediately. 

Further, if you want to correct the problem of underwatering, remove all the damaged leaves carefully, and start by watering your plant until it regains its lost moisture content. Follow this by misting the plant and by incorporating the bottom watering method. 

Fixing the lighting issue

Pothos loves to thrive in plenty of indirect bright light, but it also despises too much sunlight. What to do? You can begin by simply stressing your plant with abundant, direct sunlight. Next, you need to find a spot that offers the ideal amount of sunlight for your plant. Relocate the pot at that position. 

Do not let the plant receive more than 3 hours of sunlight. It is dangerous. Take care that your plants are precisely placed indoors only. 

Checking for root rot

Mushy roots usually indicate that nothing more can be done to prevent your plant from dying, so you need to follow these steps carefully since the life of your plants depends on them, quite literally. 

Start by pruning the damaged leaves, if any. Take the plant out carefully and check the roots. Carefully get the plant rid of the existing soil and root ball. Identify feeder roots, and take special care in not destroying them. 

Place the roots underneath running water and dry them in fresh air for 24 hours. Choose a pot of appropriate dimensions and size, lay the bed with nourishing and healthy soil, and repot your plant. 

Preventing pest infection

Insect infestation can be challenging to treat if you do not have the proper measures to treat them. Identify the puckered leaves and chop them off nicely. Dilute some neem oil with water and spray the solution on leaves. 

Continue spraying the solution weeks after the infestation is tackled and gotten rid of. You can dab a cotton ball absorbed with isopropyl alcohol and rub the leaves with the solution for instant relief. 

Adjusting the temperature and humidity

Choose the right temperature and humidity conditions for your pothos plant to grow. Note that in order for the pothos plant to survive, both temperature and humidity are required to be ideal and constant. 

Cut the affected leaves, and maintain a temperature range of about 30 to 55 degrees Fahrenheit. Finally, keep the humidity conditions above 60% at all times. If needed, remove the dehumidifier from the surroundings of your pothos plant. 

Conclusion

Once you diagnose your plant for the right symptoms of death, you might feel that there is nothing you can do to save it. 

But, as we saw above, this might not always be the case. As soon as you identify your plant dying, administer the required steps with the utmost care, groom your plant, and nothing can stop you from reviving your devil’s ivy. 

Overwatered Peace Lily: Signs & How to Revive Peace Lily

Peace lilies are one of the most beautiful and popular houseplants that can be grown to enhance the beauty of your house garden or office balcony. However, it is not easy to keep track of everything that a peace lily requires. 

The problem of an overwatered peace lily is one of them. If you overwater your peace lily, many uninvited issues can damage your plant in ways that are hard to explain. Nevertheless, the problem can be prevented if we know what signs indicate the problem and practices that are amazing in helping us revive those beautiful and tiny plants. 

So, without further ado, let us begin. 

Overwatered Peace Lily

How do I know if my peace lily is overwatered?

There are certain signs and symptoms that can prevent your peace lily from damaging through overwatering if noticed timely. You know your peace lily is overwatered if:

  • The leaves are drooping and limping one after another 
  • Prevalence of leaf edema. It occurs when the leaf tips start turning brown, supported with water blisters
  • No visible sign of growth, or stunted growth from a long period of time
  • Leaves begin to pale overtime, till they finally become yellow
  • Presence of fungal and bacterial infections in the form of yellow spots across the leaf
  • Root rot occurs. The roots release a foul smell, blacken over time and become mushy.
  • Initial symptoms are easy to ignore. The yellowing of leaves begins from the lowermost part of the leaf.
  • Untimely wilting of the peace lily plant leaf begins. 

Also Read: How Long Can a Peace Lily Go Without Water?

Factors contributing to overwatering of the peace lily

While we have listed a few signs and symptoms that indicate that your peace lily is overwatered, we would also like to share some of the most prevalent contributing factors behind this issue. 

Check if you are following these malpractices unknowingly and terminate them from your gardening habits immediately. 

Pot Size

Analyze the size of your plant carefully, and now look at the size of your pot. Do you see any differences? 

If you have installed a pot that is larger than the size of the plant, then there are chances that you might end up watering your plant more than it requires.

This is because the water holding capacity of the pot is greater than the plant. 

Pot Material

It is important to identify between porous and nonporous pot materials. For example, glazed ceramic pots, metals, and plastics are non-porous pot materials because they restrict the loss of water from the soil. On the other hand, materials like wood and terracotta are porous pot materials that result in the loss of moisture through the pot walls. 

Temperature, Humidity, Wind

When humidity levels are considerably high, the rate of transpiration reduces, thereby also reducing the amount of moisture that sits within the plant. Similarly, high temperatures are favorable for suiting the watering conditions of the plant. 

Conclusively, high wind speed should be preferred while watering plants because it increases the rate of evaporation. 

Increased watering frequency

This one is the most apparent yet common mistake that we all commit. Frequently watering the peace lilies leads to overwatering. Instead, one should wait for the uppermost layer of the soil to dry out before watering again. 

Also Read: Why Are the Leaves on My Christmas Cactus Limp (Drooping Leaves)?

Seasonal changes

Due to the absence of sunlight and other environmental reasons, peace lilies have a history of growing slower in the winter season. Therefore, they also have a hard time absorbing water during the winter season, making them more prone to overwatering. 

Water in the drip tray

Once you are finished watering your plant, look at the drip tray in which the pot is sitting. First, check for any excess water. Then, lift it up and drain it completely. The tray should be empty after you are done watering, or there are greater chances of developing a root rot, which hampers the plant growth. 

Also Read: How to Grow Chinese Cabbage from Cuttings?

Is my peace lily overwatered or underwatered?

It can be tricky to identify if the peace lily leaves turn brown due to overwatering or underwatering. Unfortunately, many people suffer this dilemma because they do not have adequate knowledge of what they are dealing with. 

However, we can make the deal easier. We have carefully researched and extracted relevant data that would help you make an informed decision about your next watering session for your peace lilies. 

Given below is a systematic comparison of how houseplants like peace lilies would react when they are underwatered or overwatered. 

Overwatered lily Underwatered lily 
Leaves start to become yellow. They also show early signs of limping and dropping. Leaves change their color to yellow. They also become dry and crispy soon after they are devoid of enough water.
The soil becomes visibly wet and soggy.You can observe the top few inches of soil getting dry and cranky
The plant becomes entirely water-soaked. Some signs that confirm this are visible brown spots on the leaves surrounded by a yellow haloThe leaves become dry and only have brown spots, not ringed by anything else
The roots start to turn increasingly wet, mushy, and abnormally heavyThe roots here are dry and brittle with lightweight properties. 
In an overwatered peace lily, wilting becomes a common phenomenon impacting the leaves and overall plant health. In an underwatered peace lily, leaves show signs of curling, wrinkling, and shriveling.

How to revive an overwatered peace lily?

As we promised you, it is completely possible to fix or revive your peace lilies once you have ensured that they are being overwatered. Here are some tried and tested tips as to what you should follow. 

Changing the watering routine

The first step in changing the water routine involves eliminating the watering schedule that you have been following all this while. Watering according to a schedule is the major contributor to overwatered peace lilies. 

One should check the texture of the soil before watering the plant. One of the most trusted methods to do so is by plunging the finger inside the soil and feeling if it is wet or dry. 

If you feel that the dryness is perpetuating till 1 or 2 inches at the soil depth, that is your cue to water the plant again. 

Since the evaporation rate differs for each day, it is difficult to water according to a fixed schedule. If you go by the rule we described above, you would be surprised to see how sometimes you need to water only once a week, while at other times, the frequency extends to three times a week. 

Relocating plant: lighting and temperature

If your plant is diagnosed with overwatering, you need to pick the container up and relocate it to a place that suits the lighting and temperature needs of an overwatered plant. 

This is simple science. The greater the sun exposure your plant gets, the more is the rate of evaporation. So, if you have overwatered your plant, it would be ideal to relocate it to a place where the sun shines the brightest. It can either be indoors or outdoors. 

Similarly, if you are considering relocation of your overwatered peace lily, nothing will be best than a spot that receives the maximum sunlight, has the highest temperatures, and low humidity. 

Humidity

With technology occupying almost every arena of human life, there is something invented for those who face problems while living in highly humid conditions. This machine is known as a dehumidifier and it effectively acts to eliminate all the humidity from the surroundings. Humidity in the atmosphere does not allow excess water from the plant to evaporate, thereby making it difficult for your peace lily to lose excess water. 

Therefore, it is important that you select a place for your lilies that does not account for humid conditions or install a dehumidifier for best results. 

Feeding

Your plants need energy, food, and sunlight to grow. But, what does its feeding requirements have anything to do with the problem of overwatering?

A primary source of plant food is fertilizers. Fertilizers are significant for the proper growth and development of your peace lilies. However, they can also turn dangerous under certain circumstances.

If your plant is waterlogged and overwatered, the last thing you want to initiate is fertilization. In this case, it will definitely do more harm than good. Once you have repotted your plant, keep the fertilizers away from it till a good amount of 3 months.

Fertilizers are vital for plant growth, but only if used in the right situations. Once your plant looks healthy, green, and fine, should you continue fertilizing it with nothing other than organic materials.

Repotting

Repotting means changing the container of the plant with the potting mixture. But, if we are following the steps that are mentioned above, then what is the need for repotting? 

Well, here it is. If you wait for your waterlogged plant to dry up following the natural process of evaporation, then it might induce risks on your plant to develop fungal infections and root rot. 

You should not waste time as it will only do more harm than any good. Carefully extract the plant out of your existing potting mixture. Prepare a proper bed in a new container of the same size, with the help of fresh and porous soil. Next, place your plant into the new pot and give it time to adjust. 

As the plant roots get more oxygen to breathe, the root rot restores itself to a healthy position on its own. Therefore, repotting becomes an emergency go-to technique to solve the problem of overwatering. 

Additional watering tips

Apart from what we told you earlier, there are some additional watering tips that need to be present in mind, which only enhance the position of your overwatered peace lily plant. 

  • Every peace lily plant has different leaves. However, the key to remember is that if your plant has more leaves then it will also need a greater amount of water to thrive. 
  • If you are choosing a pot of non-porous material, then do not water frequently, and reverse the situation if the potting material is porous. 
  • Don’t water your plants in the winter season. Instead, when the plant undergoes a flowering period or period of vegetation growth, it requires more water. 
  • Whenever you water the plant, let it settle down overnight. It will make the plant happy, more than you can imagine.  

Conclusion

The bottom line is if you find that you have accidentally overwatered your peace lily, do not worry. While we decide to take care of this houseplant, the problem of overwatering is most common. The good news is, it isn’t that big of a deal. You can prevent and fix your plant by following the tips mentioned earlier.

If you are growing a peace lily for the first time, then we guarantee you there is a lot more learning to do. 

How to Grow Chinese Cabbage from Cuttings?

Chinese cabbage appears to be somewhat distinct from the conventional type, yet it is full of richness and looks fantastic in salads. This is a hardy biennial that could be cultivated year after year. The veggie is very stunning to look at. It has large, thick, delicate leaves with strong midribs.

You may cultivate a range of varieties. Loosehead Chinese cabbage is divided into two variants: Pei Tsai as well as Chinese cabbage. Loosehead cabbage is often picked for its stems, which ultimately regrow. Then there’s Napa and Michihili cabbage, both must be picked at the top.

Also Read: Why Are the Leaves on My Christmas Cactus Limp?

Is it possible to produce Chinese cabbage from cuttings?

You very certainly can. Chinese cabbage may be produced simply in the house and yard from both cuttings and scraps. Growing Chinese cabbage from cuttings is a straightforward and enjoyable process. This is also a fantastic enjoyable activity for children if you’re not making this for yourself. Children will love the process of watching what will normally be cabbage scraps or refuse to transform into a truly useful food source in only a few days. To get started, all you would want is a starting stalk. Let’s go through it in depth.

You only need the following items to produce Chinese cabbage from cuttings.

A deep, wide-based container that can store water is required. You’ll also require a decent knife as well as some water. That is, obviously, including the Chinese cabbage.

Step 1 – Purchase any Chinese cabbage.

Chinese cabbage (often known as pak choy) may be purchased at any global supermarket, farm shop, or simply from a relative or friend. You’re fine to get there as far as you have a stalk of leaves. There’s no sterilizing that prevents these from being produced in a household like some of the other vegetables. Any Chinese cabbage will suffice. You may use any variety of Chinese cabbage, including baby Chinese cabbage, bok choy, and others; they all function the very same.

So, go over to the local grocery store and get a neatly packed Chinese cabbage. It’s the length of a standard ruler (30cm/12in). As you’ll see, it’s not like the typical cabbage almost everyone is familiar with, that appears in the shape of a spherical ball referred to as a cabbage head. Even though the Chinese cabbage is stacked like a typical cabbage head, it seems to be extended.

Step 2 – Remove the Cabbage’s Lower Portion

On Step 1, use your entire cabbage and chop off all the lower parts approximately 3/4 of the way up the cabbage. The lower portion is what you’ll need to save for the regrowth. This cabbage would have a radiant-like golden core, particularly if that has completely developed. It will be transformed wonderfully over the following several days. Prepare and eat the rest of the top half of the vegetable however you like. There are several recipes available online for preparing Chinese cabbage, or napa cabbage.

Also Read: How Long Can a Peace Lily Go Without Water?

Step 3 – Put the lower part of the Chinese cabbage into the container.

Next, insert the previously cut-off lower portion of the Chinese cabbage in the jar, platter, or punnet. Add little water around it, making sure that just the absolute base is submerged.

Where should one plant it?

Chinese cabbage prefers cold, damp, and moist conditions. Put the tray somewhere where there should be some lighting. Your kitchen sill would be ideal, but any appropriate location containing light that is not in bright sunlight will suffice. Avoid prolonged exposure to direct sunlight. That’s all there is to it! Leave it alone and watch it flourish.

Care and upkeep

The Chinese cabbage is now set to sprout. What you have to do is simply let things bathe in the sunshine and sip from the container. Once the core of the Chinese cabbage turns deep green with time, you’ll notice fresh plant development. It is natural for the outermost leaves to turn yellow. This plant is shedding its old leaves and producing new ones. There’s nothing you have to do except let it receive some light and make sure it stays filled up with water.

Make sure to replace the water each day and if you notice that the original water level is dropping because of evaporation or just the plant consuming part of it. We additionally suggest switching the water once in a while to retain the plant healthy and decrease the possibility of it decaying. Remember that overly excess water can lead the cabbage to decay before you reach the ground sowing phase.

Also Read: Do Marigolds Keep Snakes Away?

Step 4 – The Chinese cabbage will begin to bloom.

Near the center, you’ll see the appearance of completely new greenish sprouts that should keep growing. The initially yellow middle would start turning green. Simultaneously, the outer edges of the initial cabbage should shed life while new life arises in the core. Bravo, you now understand how to produce Chinese cabbage from cuttings.

Step 5 – Plant Pruning

Its green leaves begin to appear around day 5 or more. At this stage, the crop is utilizing one’s nutrition because the water provides nothing to contribute. Your Chinese cabbage must now be prepared for sowing in soil. Prevent accessing the core of the cabbage by pruning the deceased or feeble/ slippery white stem encircling it. Replace the crop in the water for a further two to three days.

Step 6 – Move the Chinese Cabbage out from Water into the Ground

Up to this point, this has become a successful run. It is important to give your Chinese cabbage an existence of its independence in the ground if it is to reach maximum potential – literally. Place the plant inside a nutrient-rich ground. When the center has sprouted new green development and roots, one may take the Chinese cabbage from water & put this in a container containing potting soil or straight in the yard.

It can be done straight into the soil or even in a large enough container. Make a cavity in the center of the pot then place the growing cabbage in it. Continue to water and care for the plant. Then that will keep expanding until it reaches full maturity. This procedure is optional, however, it should provide the plant with the nourishment it requires to rise higher, and you’ll also be fortunate to receive 2 or 3 tiny harvests from a single plant.

To enhance airflow and reduce the likelihood of infection, begin by cutting part of the yellowish exterior stalks. Then, place the Chinese cabbage so the roots and bottom are approximately one inch down in the ground with the head of the existing cutting as well as any regrowth well above the surface of the ground.

Water liberally and retain the soil damp but just don’t allow the soil to get soaked. Now you can relax and let it develop! You may begin harvesting the greens as needed, or you could just cut up the entire plant after it has grown, which should take 2 to 3 months.

Don’t Throw Away The Scraps

Rather than throwing out the scraps now next time you purchase a batch of Chinese cabbage, why don’t you consider regrowing those? There will be nothing to risk because it’s so easy and enjoyable! Believe us when we say that the entire family will love seeing those rich green leaves reappear, almost by miracle.

Do Marigolds Keep Snakes Away?

Recently, people have been actively engaging in the practices to find snake repellent plants for growing in their own backyards. While there are ongoing speculations about whether or not marigold is a successful snake repellent, we are here to clear all your doubts surrounding it. 

We will be answering the question “do marigolds keep snakes away” while also keeping in light some other plants that have been useful throughout. 

Let us begin our quest by gaining insights about marigolds and how they help in keeping snakes away if that is what they actually do. 

What are marigolds?

Commonly available in the vibrant colors of yellow and orange, marigolds are scientifically known by the name Tagetes and are a genus of the sunflower plant. This plant is exotically native to the regions of North America and South America, varying in size dramatically. You can find marigolds being as short as 5 inches in height to as long as 3 feet in length. There are no specific reasons for these variations, but we will assume it to be completely normal. 

Marigolds are famous for their smooth nature, making them easy to grow and available throughout the annual season. 

Also Read: Why Are the Leaves on My Christmas Cactus Limp?

The most intriguing factor about marigold is its ability to be able to perfectly fit in either a closed container or an open garden. Marigolds are available in the markets as 50 different species, with three species dominating the profits. These are the African marigolds, French marigolds, and the Signet marigolds. 

Do marigolds keep snakes away?

Long answer short, yes. Marigolds play a foundational role in keeping snakes away. In fact, some botanists suggest people buy marigolds if they are searching for the perfect bait to repel snakes.

Before we step into the know-hows of how marigold keeps the snakes away, let us understand the damage that snakes can produce with their presence in your garden. Snakes- as we all know- are highly poisonous creatures; at least some of them are, therefore they are deep theta to you, your pets, or the thriving green thumbs in your garden. Factually saying, pests such as slugs, mice, voles, and beetles provide more damage to plants than snakes. 

They do not provide potential harm to your plants as such. 

Having said that, commercially bought snake repellents can never surpass the effect that organic tricks sustain. There is undoubtedly no better organic tip to keep snakes away than to grow marigolds. 

As snakes slither over marigolds, they display a sense of disorientation and discomfort, primarily due to the bitter taste and potent smell that marigolds produce. Snakes cannot tolerate strong odor and are therefore used to chase away serpents and snakes.  

It is important for you to know that no research claims support this evidence, but gardeners do swear by the efficiency of marigolds in rendering the garden serpent free. Marigolds are inexpensive and beautiful to look at. Their ability to drive away snakes adds to their never-ending benefits. 

It is advisable to sow marigold seeds as soon as the winter season passes by, preferably in spring. To keep snakes away, grow marigolds in the outbuilding and at the outer boundaries of your yard. Take care of their sunlight, water, and soil requirements, for they should be adequately taken care of. 

If marigolds don’t work out, try removing all the garden debris and covering pet food so that there are no baits left to attract snakes. In addition to this, chemical-free commercial serpent repellents can also be of use. 

Also Read: How Long Can a Peace Lily Go Without Water?

Other plants that keep snakes away

After much empirical research, it turns out that marigolds are not the only plants that you can grow to drive snakes away. Instead, there are a lot of easily accessible and cost-effective alternatives that can be used to do the same job. 

Some of the most common plants used by gardeners are Pink agapanthus, Variegated snake plant, Lemongrass, Sarpagandha, Garlic, Indian snakeroot, Mugwort, Lily of the Nile, Wormwood, Society Garlic, Kaffir-Lime, Cactus, Jimsonweed, and Creat or Green Chireta. 

While there are many non-venomous snakes that do not cause harm to living beings and can, in fact, prove advantageous by eating unwanted rodents and insects, venomous snakes are less likely to come in the absence of an attractive food source. 

Also Read: Mold on Microgreens: How to Prevent & Get Rid of Them

How to keep your marigolds intact?

Marigolds play an essential role in keeping away dangerous reptiles like snakes from entering your garden, and we have examined the how and why of the same.

However, what is essential is for us to establish supportive and nurturing conditions for our marigold plant so that it thrives, remains intact, and assists us in keeping bugs, insects, and snakes away from entering the house. 

Following are some valuable tips listed that would aid you in growing dream-like marigolds of supreme quality. The only trick is to follow them as stated: 

  • If your plants are becoming leggy and having a hard time blooming to their full potential, try pinching their tops off immediately after establishing their roots. It will encourage them to grow bushier. Further, observe the dying blossoms and remove them as soon as they turn brownish in color.
  • Summers induce scorching weather and extract all the water out of the soil quicker than ever. Therefore, water marigolds more often under high heat conditions. When watering, take care not to do so from overhead; instead, water at the plant base.
  • When the marigolds are undergoing periods of growth, it is crucial to keep the fertilizers as away from them as you can. This unpopular opinion stems from scientific facts claiming that nitrogen-rich fertilizers would not benefit marigolds in the long run if sprayed during their growth.
  • While it is important to meet the daily watering requirements of your plant, it is also essential to keep a check on not overwatering the soil. Too wet or too soggy soil tends to encourage root rot and foul leaves, which is a direct source of arm for the progress of your marigolds. 
  • For suppressing unwanted plants, or weeds, add a layer or two (if it’s a thin layer) of mulch between the plants. This is much needed when the plants are young.
  • Given their exquisite color and vibrant fragrance, it is difficult to believe that marigolds do not attract many pests and diseases. Nevertheless, spider mites and aphids still find their way to infest the blooming plants and their flowers. They do not require much to drive them away. A spray of water or a bar of insecticidal soap is more than enough to protect your plants.
  • If you continue to dispense your plants with additional water needs, be ready to encounter fungal infections like powdery mildew on your marigold leaves. Under such conditions, you can only act to reduce the amount of water sprayed on your plants dramatically. Also, you can exchange your soil for well-drained soil that absorbs essential nutrients and keeps the additional water draining systematically.
  • If you wish to decorate your interiors with marigolds, you will be delighted to know that they remain dry and fresh even after much time of removing the flowers from the plants.
  • Marigolds have edible properties, and they make a perfect addition to summer dishes. If you wish to, you can also consume them as a tiny part of your meal. 

Conclusion

When we started, we had a perpetuating question in mind, that is, whether or not marigolds play a successful bait in keeping away snakes.

Not only we got our answer to that, but we also came to realize marigold is not the only plant in the race, but there are 14 other plants that have proved their effectiveness in keeping these dangerous animals at bay. 

Further, we also got to know more about marigolds and the conditions they thrive in. We hope that now you are all set to plant those beautiful marigolds in your backyard. 

How Long Can a Peace Lily Go Without Water?

Peace lilies (scientific name-spathiphyllum) are popularly known as closet plants as they can grow indoors in offices and homes. Peace lilies are a type of tropical house plant which is easy to take care of.They make a fantastic option for house plants and add a hint of brightness in offices and homes. They add some texture to the room and also clean the air of the room.

House lilies have dark green leaves and white flowers; however, their discerning feature is a white leaf bract that grows hooded over the flowers.

How long can a peaceful lily go without water?

Are you a new plant parent and need help deciding on a watering schedule, or are you going out of the station without anyone to water your plants?Don’t worry; below, we have provided the approximate watering schedule and how long water lilies can survive without water.

Are you wondering how long houseplants can go without water? Most houseplants can live up to 2-3 weeks without water and need little to medium sunlight to survive. However, these needs can change from plant to plant and the weather at your place.

Here are the factors that influence the water needs of houseplants-

  • Plant type
  • Plant size
  • Plant age
  • Growing medium and condition
  • Indoor conditions-light, temperature, humidity 
  • Regional climate
  • Season of the year
  • Current weather
  • Pot size and material 
  • Growing phase

Peace lilies should be watered approximately every 5-7 days to ensure good health. They can survive for about 10-12 days without water maximum; they would wilt any more than this.

Watering schedule-once every 5-7 days

Can go without water for 10-12 days

Also Read: Why Are the Leaves on My Christmas Cactus Limp (Drooping Leaves)?

What would happen to a plant without water?

A plant will die without water. Plants use sunlight, carbon dioxide, and water to process their food (photosynthesis), and if not watered, they wouldn’t be able to function or process food and thus die.

Water is also needed to make a plant’s tissue called turgor rigid. Turgor uses water to keep the plants upright. Lack of water will weaken the turgor, and the plant would droop and wilt.

If a plant is not watered for a more extended time, the roots would be affected, and the plant may never recover. 

Also Read: Mold on Microgreens

Peace lily plant care

Now that you know plant lilies’ water needs let talk about some more tips for taking good care of your closet plants.

Water

A widespread and beginner mistake in taking care of houseplants like plant lilies is over watering. Houseplants like water lilies are way more tolerant of under watering than over watering.

Peace lilies are closet plants; they need little light and little water to survive. Water lilies are very drought tolerant and cannot handle over watering.

A quick way to check if your peace lily needs water is to touch its soil once a week; if it is damp, do not water, and if the soil is dry, water the peace lily. This method will prevent over watering.

Light

Peace lilies need indirect sunlight. If the leaves turn yellow, it is a sign that the plant is getting too much light.

Fertilizer

Like water, peace lilies do not need frequent fertilizing. Fertilizing them with a good and balanced fertilizer once to twice a year will be enough. Summer months are the best for fertilizing.

Repotting

Peace lilies would also benefit from reporting or dividing when they have outgrown their pots/containers. Signs peace lily needs repotting-

  • Dropping less than a week after being watered 
  • Crowded leaf growth
  • Deformed leaf growth

If you are repotting your plant lily, use a container that is at least. Inches bigger than the previous container. On the other hand, if you are dividing, use a knife to cut through the middle of the root ball and repeat each part in its container.

Cleaning

Peace lilies leaves can be a dust magnet. Not to exaggerate, but peace lilies can accumulate a lot of dust. You would need to wipe down the leaves or wash them lightly to get rid of the dust. This will also lead to better sunlight absorption.

Use a damp cloth to wipe down the leaves or wash them, placing them underwater till the leaves get rid of the dust. Don’t use commercial leaf shine oviducts as they can clog the pores of leaves and be damaging. 

Why you must have a peace lily in your home?

Peace lilies are great indoor plants and especially for those who like flowering plants without the usual hassle. They need little care, purify the air, and bloom beautifully.

Here are some reasons why you must have a peace lily-

#1 Air purifier

Peace lilies quite literally act as an air purifier. There are many pollutants present in homes, from dust to carbon monoxide, plant lilies clean them.

Harmful pollutants can cause many health problems, but cobra plants like peace lilies clean the air. According to a study by NASA, peace lilies absorb pollutants like xylene, benzene, carbon monoxide, and formaldehyde up to 60%.

#2 Easy to maintain

Peace lilies are not just a treat for the eyes but also are low maintenance. They need indirect sunlight and need to be watered only once a week. Plus, they don’t need to be regularly fertilized. 

Anyone with a busy schedule or a forgetful nature can take care of it. Peace lilies work better with underwatering than overwatering, so even if you forget to water it, peace lilies will continue to thrive.


#3 Better Sleep

If you are an insomniac or have been facing trouble sleeping, consider getting a peace lily. It is beautiful to look at, filters the indoor air, and increases the level of humidity, helping one breathe better. 

It absorbs airborne mold spores that can cause allergies and aid in good Sleep. Its beauty is set to bring calmness and alleviate feelings of stress. It adds positive energy to the room.

#4 Spruce up the decor

Houseplants like ace lilies are perfect to spruce up the decor of your 

Room/house or office. Need some color in the room-get a peace lily, want to fill an empty space-peace lily, want to give a sophisticated look-peace lily it is.

The peace lily is chanting to look at, especially its white cage leaves, which are a perfect contrast to the deep green ones.


#5 Prevent mildew

High moisture content can lead to mildew and a moldy smell. Mold is susceptible to the kitchen, bathroom, and washrooms. Peace lily will prevent mold in high moisture areas.

Peace lilies absorb extra moisture from the surroundings and prevent dampness that could have caused mildew.

#6 Remove dust

Are you troubled by fine dust? Get a peace lily; they are dust magnets and accumulate all of the fine dust in the room on their leaves. Occasionally clean the leaves with a damp cloth or by washing them.

Conclusion

Peace lilies are a type of houseplants that need little maintenance. They need to be watered once a week and go up to 12 days without water. It is good to check if it needs watering by touching the soil; if damp, don’t water; if dry water.

Why Are the Leaves on My Christmas Cactus Limp (Drooping Leaves)

Cactus, whenever we hear something about cactus, our mind transfers us into a desert- like region that is filled with sand and has no sign of water anywhere. However, some of you might be surprised to know that the Christmas cacti differs from other species in a unique way.

That is, it is a native of, and hails from the Brazilian rain forests and thus significantly differs from its counterparts in the light, temperature, and watering needs. In fact, another interesting fact is that you can grow these beautiful Christmas cacti in your own backyard too.

However, problems like “why are the leaves on my Christmas cactus limp”, or “how to solve the problem of decaying Christmas cactus” might see a dramatic rise as you decide to grow them yourselves. 

But, do not worry, we will address your Christmas cactus issues as and when they arise. In the preceding article, the causes and prevention tips regarding limping of Christmas cactus leaves would be thoroughly discussed and brought to light. 

Without further ado, let us begin. 

Also Read: Mold on Microgreens: How to Prevent Them?

Causes of Christmas cactus limp

Improper Watering

Improper watering refers to over watering here. It is not advised to over water a Christmas cactus at all. That is right, if you are doing it, then you might as well be compelling them to droop and limp, when they are not wanting to. 

Originating from the tropical region, some might expect Christmas cactus to demand more water. To some extent, it is true. They need more moisture than their counterparts to grow, but that does not apply to the overall watering techniques.

More water can either directly promote leaf drooping, or contribute to rotting of roots, which indirectly leads to leaf limping. Further, under watering also remains a big no-no. So, how can one identify the ideal watering measures?

Ideally, it is suggested to water Christmas cactus once every week close to the surface of the soil. In addition, you can also water your plant when the top layer of the soil becomes visibly or tactile dry.  

Poor drainage: Soil

If the soil you use for growing christmas cactus is poorly drained, then it might as well be another reason for your leaves drooping and limping. No extreme soil type is a good one. A soil that is either too dense or too compacted would not be appreciated by the plant. 

Instead, one should choose the kind of soil that is porous and promotes a well drained soil system. If you find your soil being compacted, then it is time for you to repot your soil to another pot with a fresh potting mixture and soil.

If you cannot find a porous and perlite soil, then create drainage holes in the pot to make way for ventilation. 

Temperature

Christmas cactus plants appreciate a moderate climate, that is, a weather that is neither too hot nor too cold. Their inclination is slightly biased in favour of warm temperatures though. Anything that falls in the temperature range of 21 to 27 degrees Celsius. 

Temperatures above 32 degrees Celsius do not support the good health of christmas cactus leaves, destroy them, and promote their ill condition. As a matter of fact, the plants can tolerate temperatures falling below 10 degrees Celsius, until and unless it is in the stage of budding. 

While natural temperature changes are common and accepted, sudden changes in temperature can be harmful to the plant, and so one should avoid that. One should remember this while shifting the plant position from indoors to outdoors or vice versa. 

Light 

Sunlight is a tricky requirement for christmas cactus leaves. This is because they need light, but not in the form of direct sunlight, instead an indirect and moderate sunlight ray. Summers produce a great problem, since they only bestow intense sunlight, and therefore one should make proper arrangements for shade to cover the plant whenever it is possible and required. 

If abundant light is  present directly on the leaves, then they shall droop down as soon as they can. 

Other reasons

The aforementioned reasons are primary, but they might not be all. Apart from this, other secondary reasons might also become a source of worry. One of them is root rot. If the root is decayed, it destroys its natural ability to absorb nutrients, thus resulting in a rapid limp of christmas cactus leaves. 

Further, improper use of fertilizers in inadequate proportion can also disable the thick and green leaves to stand erectly. One should always remain careful of how and where they place their christmas cactus plants. 

How to Get Rid of Christmas Cactus Leaf Limp?

Checking moisture levels

According to scientists and other credible sources, limping and drooping leaves are a sign of inadequate moisture provided to the plant. Therefore, we would begin our prevention journey from here. 

Wet, and soggy soil can contribute to limpy, wrinkled, and drooping leaves. You can curb this problem by making small drainage slots at the bottom of the pot, that gives a way for excess water to flow out. 

Excess water might also contribute to root rot, which is an indirect cause to limping leaves. Check your roots carefully for signs of root rot, and in case of any suspicion, move it to another pot with a fresh potting mixture. 

Further, over watering and under watering can also contribute to wilted leaves. Since each species of christmas cactus demands different water quantities, it is important to analyze the flowers of your cactus plant to determine how much water it needs. 

On an average, a christmas cactus plant should not be watered more than once a week, or in rare cases of when the top soil dries out excessively. 

Using the right soil

Carefully catering to the appropriate soil needs of a christmas cactus plant can save your leaves from drooping and wilting. A soil mixture that is airy and supports fast draining is believed to be the best soil for growing christmas cactus. 

You can make your own soil mixture for christmas cactus by mixing peat moss, perlite sand, and potting soil in equal proportions. If you want to save yourself some time, but not enough money, then you can also opt for buying commercially available soil. 

Waterlogged or compacted soil can become a hazard for cactus plants, making them hard to breath and survive. In such cases, change your soil and pot after the flowering process. 

Fertilizing

While most people do not mention this, it is important to consider the fertilising requirements for the Christmas cactus plants. A soluble fertilizer should be sprayed on the plant, at least once or twice each month. 

The most preferable time to fertilize them is considered to be late winters through summer seasons. It promotes good health and condition of the plant and keeps it steady and away from pests for longer time durations. 

Temperature

Moderate and humid environments are what a christmas cactus plant seeks for. If you use a dehumidifier for other plants in your backyard, then make sure to place your cactus pot far far away from that machine, because these plants strive for humidity, and so do their leaves. 

Further, shifting it to a cooler region immediately after it blooms, is suggested to prevent the leaves from getting wilted, and/or limped.

Light

If your leaves are wilted, check if the christmas cactus plant is placed immediately under straight direct and intense sunlight or not. Chances are, that it would be. Too much light is not good for the leaves, as well as the plant nutrition. 

Instead, try to place it in a shady region that also receives regular, but indirect sunlight. 

Additional Tips 

  • The environment requires some humidity, so arrange the conditions accordingly. 
  • Dropping off some buds every now and then is not a matter of concern. Do not take decisions in haste if something like this happens. 
  • Do proper research for the variety of christmas cactus that you decide to purchase. Make sure to know the bloom time of each of those varieties, and prepare your apparatus accordingly.
  • The plant should also be kept away from sources of direct heat that includes sources like fireplaces, or even a heating vent. 
  • The air around the plant should not be kept too dry, especially during winters. Additionally, water should be provided keeping in mind the time and dryness considerations. 

Conclusion

Scientifically known as Schlumbergera buckleyi, Christmas cactus appear to be distinct from other of their dessert dwelling cousins and look gorgeous with blooming flowers and rich green leaves. Native to its tropical origin, the plant expects a replica of the situation wherever it is placed, in order for it to thrive and grow. 

Also known as holiday cactus and crab cactus, these are the most fascinating holiday plants that have become trendy in contemporary times. The aforementioned tips would assist you in providing maximum protection to your Christmas cactus leaves from limping, making them look absolutely phenomenal throughout. We guarantee you will get the solution for why is my christmas cactus dropping leaves. 

Turns out these easy to grow plants are not that easy to grow after all!

Mold on Microgreens: How to Prevent & Get Rid of Them

Microgreens have been in steady recognition since the early 1980s. They first came into sight when they were introduced in a Californian restaurant. They have gained immense popularity due to their versatile nature. They add taste, nutrition, as well as texture to your meals.

Surprisingly, one can also grow microgreens at the comfort of their houses. However, they can invite unnecessary problems concerning their proper growth. The most common of all these problems is the presence of mold on microgreens.

These impressive baby plants expect care and protection just like a little toddler. They require constant observation in order to thrive and bloom in the most appropriate way. While their position is still controversial, with some people considering it a sprout, and others as a baby green, one certainty is the way in which one can provide them good care.

In the preceding, you would be acquainted with the solution, causes, and identification process of mold on microgreens. Further, information will also be provided about how to take good care of your microgreens, including protection from molds.

Causes of mold on Microgreens

What causes mold on microgreens? If we know the causes, then perhaps we would also be successful in stopping them at their inception that can get us rid of this problem forever. But, it is not as easy as it sounds. After much research, agricultural scientists have not been able to arrive at any one primary cause that contributes to the growth of mold on microgreens. 

However, we can definitely ponder upon some indefinite cause and get an idea what leads to this disastrous result.

Some people place the blame on the conditions in which microgreens are growing. They believe that those conditions present favorable circumstances for mold to thrive and progress. Some of these environmental conditions include excessive humid or moist climate that does not let the air flow freely and keeps it stagnant.

Further, any temperature range above 70 degrees Fahrenheit also promotes mold on microgreens, which should be kept in check. Secondly, not sanitizing the equipment, seeds, and trays after use give space for molds to grow and prosper freely as much as they want.

Besides this, problems like improper germination of seeds, over watering seeds constantly, and inadequate lighting requirements also promote molds on microgreens.

Preventing mold on microgreens

Ventilation

Stagnant air provides an opportunity to mold to grow and even breed. Therefore, mold cannot thrive in moving air, or a well ventilated space. This gives us a solution to our problem, that is, always keeps the region surrounding microgreens well ventilated.

In order to bring about this change, you need to add some ventilation slots in the container holding microgreens. Next, place a fan in such a way that it directs air straight into the container through those ventilation slots.

You can turn them either for 15 or 30 minutes of each hour to ensure that the air is moving and is replaced by fresh molecules at regular intervals.

Light, Temperature, and Humidity

In order to protect your microgreens from any kind of mold, these three environmental conditions, namely light, temperature, and humidity, are required to be under constant control. It is important to note that light here doesn’t only mean sunlight but also other artificial lights.

The best option is to place them under indirect sunlight most of the time, so that they can get whatever they are missing. Putting them under artificial lights is not preferable and can affect the growth structure of microgreens.

Maintaining a moderate temperature around the crop is appreciated, either through the use of shade, or fans, or other machines. Furthermore, humidity can be a tricky point. Since your microgreens need water, excess of it can cause mold.

In such a situation, one can safely opt for removing moisture out of the air by making use of a high quality dehumidifier. They are affordable and can promote the health of microgreens effectively.

Hydrogen Peroxide

Hydrogen Peroxide can be seen as a perfect solution to the problem of molds on microgreens. They are used to clean the equipment and all the other things in order to keep the microgreens away from the mold.

One can spray hydrogen peroxide on the trays and other apparatus thoroughly using spray bottles of different measurements, according to the quantity of things you want to spray it on. Apart from this, before sowing seeds, one can also sanitize them from hydrogen peroxide that keeps excess moisture and humidity in strict control. You can either prepare this sanitizer organically, or purchase them from markets.

Avoid seed bunching

Collecting all the seeds together, keeping them close, and bunching them can increase the level of moisture between the seeds, while also acting to reduce the airflow. As the microgreens grow together, due the bunching of seeds, the air movement would be restricted, perhaps even blocked.

As the moisture content elevates, and air level is restricted, mold would find a perfect situation to grow. In order to escape such a situation, spread your microgreens seeds evenly throughout the soil, with adequate space between each seed, giving them room to breathe and grow.

Sunlight

Mold is not a friend of sunlight, and it is also something that is present abundantly. If you witness mold on microgreens, then place them under direct sunlight immediately, until the mold is destroyed.

Sunlight acts to dry out the mold present on your microgreens, and fastens the process of removing that mold from your plant. Since direct exposure to sunlight can place your plants in danger, it is important that you prepare for adequate supply of water to your microgreens. A watered tray might be of immense help.

Sanitizing trays

Microgreen trays can become the biggest contributor to mold, if they are not cleaned and sanitized regularly after usage. There are numerous ways through which the trays can catch mold, and can become stubborn to lay off.

One can sanitize trays through a lot of methods. These alternatives can come handy when one or another ingredient is not present with you. Some of these methods include using a dishwasher, a combined spray of hydrogen peroxide, vinegar, and bleach, and spraying distilled water.

In order to keep mold at bay, one should take proper care in sanitizing these trays after each and every use. Multiple brands and their products can be searched for this purpose.

Drainage

A soil with well drainage properties, like perlite, volcanic rocks, age old forest products, or irregularly textured rocks is the perfect soil match for growing microgreens. They do not let unnecessary water accumulate near the plant and safely channels it down, to lower the moisture and humidity content.

A generously porous soil will be of excellent help in this matter.

Trying remedies

Additionally, there are some tried and tested effective home remedies that are easy to use once the presence of mold on microgreens is confirmed. Remedies include combining the aforementioned steps and implementing them adjoint, and not simultaneously.

In doing so, one shall also open ventilation slots while installing a dehumidifier. Provide sufficient direct sunlight, while also maintaining shade at appropriate times. This technique works almost every time and would do so in your case too.

Additional treatment plans

Finally, if nothing is able to get you out of this situation, then we have treatment plants consisting of different ingredients that could be of additional help in cleansing away all the mold from microgreens.

Some of these treatments include using grapefruit seed extract, vinegar, hydrogen peroxide and water, finally, making judgments on your own. You can try them individually to reach for the best solution to your mold on microgreens problem.

How to take care of microgreens?

The right season

Microgreens usually do not take more than 7 to 21 days to grow, and consume. When you are doing this is important. Know which weather is right for your seeds. Some seek humid conditions, while most prefer winters.

Research also shows that moon phases each month provide the best time for seeds to grow, germinate, and bloom.

Protecting

Microgreens are baby plants and so they demand protection and gentle cae just like little kids. They need shelter for a variety of purposes, the first one being the weather considerations. Protecting microgreens until the germination period, not only from the weather, but also from rodents, ants, and other insects is vital.

You can protect microgreens by building a mini greenhouse, or simply with a plastic bag, a glass, lid, or even a bottle.

Feeding them right

It all starts from the food. Feeding them adequate proportions of the required nutrients is important to keep the plants healthy.  The primary food source is the right soil mixture. Pay attention to the soil you use and the nutrients it imbibes.

Choose a soil that promotes well drainage properties and is able to hold moisture for long. You can either purchase commercially present seed soil mixtures, or make a DIY at your own home. Organic mixtures provide exceptional growth.

Transplanting

Transplanting microgreens is by far the most underrated caring tip. You have successfully grown your microgreens, and have probably consumed most of them. Next what? Are you planning to waste the rest of them? Definitely do not do that.

You can use these seedlings and grow them in pots either indoors or outdoors. It is a simple process and does not require much assistance. In order to implement your microgreen transplantation, use a fork to gently lever the seedlings out, holding the leaves, and not touching any other part plant.

Finally, the baby seedlings can be carefully seated in the potting mix using adequate potting mixture. With some days of adequate sunlight, you can see how your seedlings grow out from seeds.

Storage

Storing or harvesting microgreens is a very essential process and it requires subtle training. Difficulties present themselves in hot and humid weather, when they are ready for harvest at the end of that season.

Fans and coolers can be of help, but not for long. A long term and effective solution is refrigeration. Take a sealed container that is spacious enough for your microgreens to be seated and does not bruise them.

Next, snipe them off carefully and place them in a container in the fridge till the end of the season, till the harvesting time arrives. This is a proven method for keeping microgreens fresh, crisp, and alive, for a stipulated time period.

Conclusion

Among the surprising amount of potential health benefits that these little things bestow, one should not undermine the diseases they invite, if not taken care of seriously.

There are a lot of contributing causes that can stimulate the presence of pests, but if one takes proper care and personalised attention to them, then it should not be difficult to achieve a good yield packed with the wellness of your backyard.