Do Dracaena Like Coffee Grounds?

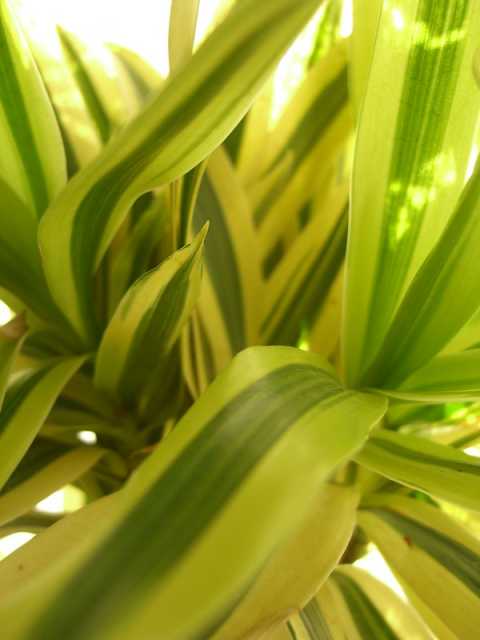
Plants generally generate a relaxing mood within the four walls of the house and enhance the overall ambience. Dracaena plants, on the other hand, are not like green plants. Therefore, the beautiful Dracaena trees are considered the most attractive flora.

These Dracaena trees are highly attractive and add elegance to the comfy style with their thin and lovely foliage. Furthermore, these species are low-maintenance and may grow in nearly any environment. Nevertheless, for the best development, a bright background is required.

The Dracaena tree doesn’t withstand direct sunshine and likes to grow in a slightly remote region. Therefore, the luscious green leaves would display their maximum potential with careful care. The foliage of this lovely plant is crisscrossed with pinkish to flaming red lines, adding to the tree’s beauty.

Why Use Coffee Grounds To Fertilize Indoor Plants?

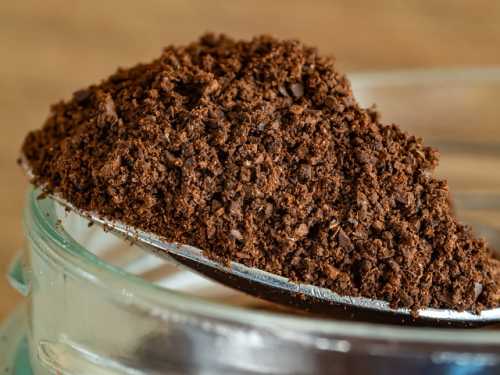
Coffee grounds are typical kitchen refuse items that are packed with nutrients but are usually discarded. They’re easy to come by, free, and high in nitrogen, which is among the most critical nutrients for plant development. Coffee grounds are often a fantastic method to decrease kitchen wastage by using them on houseplants.

Humans have used coffee grounds in the yards with good reliability for decades; then, it’s only logical that they’d try using them to fertilize house plants. As we’ll see, this is absolutely something that you should think about.

To stack coffee grounds in soil, follow these steps: a third of leaves, a third of fresh grass cuttings, and a third of coffee grounds. If nothing else, the coffee grounds’ texture will deter snails. When you’ve gathered all of your coffee grinds, put them on top of the soil. Never use coffee that contains milk or some other ingredient to nourish or fertilize plants.

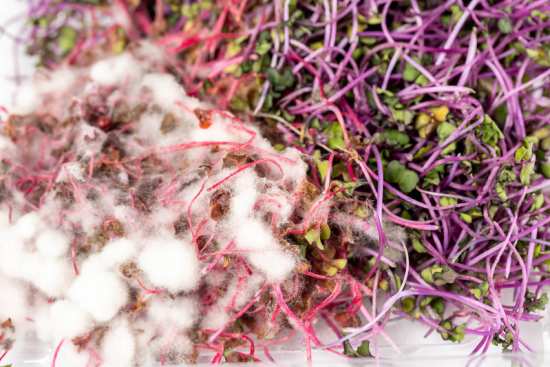
Also Read: Why are Dracaena Leaves Turning Yellow and Brown?

Do Dracaena Like Coffee Grounds?

A natural fertilizer promotes healthy development and encourages the production of more leafy green and lush leaves. Dracaena trees require a variety of fertilizers as well. A nutrient deficit may be addressed by using fertilizer units regularly. The essential nutrients that these trees need are potassium, nitrogen, plus phosphorus.

These vegetation don’t grow as well as they should or have an overabundance of brown leaves if they don’t get these nutrients. This deficit can be detected by a pale leaf hue or white specks. Plain coffee grounds could be used as organic fertilizers; you can keep them for many days and occasionally blend in with the potting mix. You can even use coffee grinds as a liquid fertilizer by mixing them into irrigation water.

Also Read: Can I Put My Dracaena Outside?

About Dracaena Plant

There are more than 40 produced kinds of Dracaena, which originated in African woods. “Corn plants” (dracaena fragrans) and “Dracaena trees “are two common names for prevalent variations. Although Dracaena braunii is not connected to actual bamboo, a shorter variety is planted in water and marketed as lucky bamboo.

Where to Plant?

Dracaena generally thrive in low to medium sunlight, but strong, indirect sunlight produces the greatest results. Too much or too little moisture and too much or too little sunlight can have leaf browning. If poor moisture is an issue, spraying the plant’s foliage or placing it in a shallow dish loaded with stones and water will assist. Let’s look into detail about the things you have to take care of while planting the Dracaena.

Also Read: Why Chinese Money Plant (Pilea) Losing Leaves | Falling Off?

Sunlight

This Dracaena tree is solely designed for your personal four walls. Therefore such dimensions are not achievable in our latitudes. The Dracaena tree can be left outside during the summer season if it is protected on the patio. Extreme sunlight, on the other hand, is not advised. A Dracaena tree, with proper care, may develop large and luscious in front of us and is often a pleasure to the eye, be it in the workplace, guest bedroom, or entryway area.

Naturally, the larger the tree becomes, the further it will need to be repotted. Dracaena roots require room and the new ground regularly. The time range for this endeavour is critical and essential if it is reviewed each year or per two years.

The correct spot for Dracaena

Nevertheless, the problem may be with the place that is either too dim or too bright. When the Dracaena tree’s foliage turns brown, the weather is excessively dry. On the other hand, whenever the Dracaena plant receives insufficient light, it produces barren, high shoots. Therefore, it’s best to chop them off and drip wax over the cut edges of the plant. Then, the nodes could be utilized to produce new, magnificent Dracaena plants as an outgrowth.

Put the shoots in a cup of water on the ledge and let them there until they grow tiny roots. You may now transplant the roots and shoots in the new soil mix. Tenerife is home to the world’s greatest and biggest Dracaena tree. According to reports, this is approximately 600 years old and has a diameter of nearly 6 metres. This luxuriant tree is a natural miracle that is more than simply attractive.

Watering Needs of Dracaena

Most houseplants demand more water, unlike Dracaena. Leave them moist by spraying the foliage with water and softly sprinkling (but not waterlogged) the ground, which should also have adequate drainage. Before pouring, make sure the topsoil is completely dry. It’s important not to overwater your plants because this might lead to root rot.

Excessive moisture or inadequate drainage may cause drooping or yellow foliage, but don’t be alarmed if the lower leaves start to turn yellowish and fall. It’s natural for dracaenas to lose their leaves to make way for new leaves, just like most plants.

Because these houseplants are vulnerable to fluoride, which is present in water from the tap, it’s critical to use filtered water while providing for them. Fluoride poisoning is indicated by dark brown foliage and dead patches with yellow margins.

Are They Toxic?

If consumed, it is harmful to dogs and cats. Dilated pupils in cats are common, and both dogs and cats may exhibit signs including puking, excessive saliva, as well as a reduced appetite. As a pet parent, it’s critical to choose your plants carefully, which requires knowledge about toxic species for your four-legged companions.

How to Grow Onion Microgreens?

In the pandemic and lockdown, we all are staying indoors and have inculcated a habit of growing plants every day, and those plants when bloom look so good. Thus microgreen is one of the plants we can grow at the farm and house. We need to understand what a microgreen is and more details.

A microgreen is a seedling of any vegetable or herb. Microgreens are very healthy to eat as they remove many health issues.

There are many microgreens available such as Broccoli microgreen: Broccoli microgreens’ anti-inflammatory features will aid in the removal of toxins from the body. Broccoli microgreens are high in vitamin A, C, E, and K, as well as protein and calcium, as well as iron, magnesium, and phosphorus. To get the most out of this versatile green, add a handful of broccoli microgreens to your soup, smoothie, or sandwich. Broccoli microgreens seeds grow best in a soil-based medium and can be harvested after 8 to 10 days.

Radish microgreens: Radishes are a good way to start with microgreens. They germinate quickly (1 to 2 days) and grow swiftly in both warm and chilly environments. They’re usually ready to harvest in 5 to 10 days. Radish microgreens are strong in vitamin C, but they also have a wide range of vitamins and minerals. They also contain a significant quantity of protein. Radish microgreens do not require pre-soaking and prefer to be grown hydroponically, though they will grow in soil as well.

Growing Onion Microgreens at Home

One of the main being Onion microgreen Onion belongs to the family of Amaryllidaceae. Onion microgreens are simple to cultivate, but they take a long time to grow, especially if this is your first time. It will take between 12 and 21 days for these fresh greens to be ready to harvest. Onion microgreens contain Vitamins A, B, C and E, calcium, iron, zinc, phosphorus, magnesium, potassium and amino acids.

  • Flavor:    Savory, onion taste; garlic aftertaste
  • Soak:    Optional
  • Rinse/Drain:    No
  • Germination:    3-4 days
  • Ideal Harvest:    12 days

What do you need to grow onion microgreens?

  • Onion seeds of any variety
  • Container: at least two shallow containers, such as these, that can be poked with a hole.
  • Medium for growth: Coconut coir or Espoma seed starting mix
  • Light: The Agrobrite T5 grow light or natural sunlight 
  • Spray bottle
  • Shears for the kitchen

Though we talk about growing onion microgreens but do we know that they benefit us also in many ways:

  1. Microgreens help in boosting your immunity as the content of vitamins is high and also microgreens are nutritious and can be eaten raw.
  2. It also minimizes the risk of diseases such as heart disease, anemia, low cholesterol level and also controls our blood pressure level
  3. Researchers have also found that microgreens are one reason for not having constipation.
  4. For all those people who wear spectacles for eyes they should eat because it also improves and controls your eyesight number.

It’s not always necessary for you to buy microgreens from outside, if you are willing to grow onion microgreen at home you can follow these instructions:

Microgreens are simple to grow since they don’t require a lot of equipment or time.

They may be cultivated indoors or outdoors all year.

Also Read: How to Get Rid of Mold on Microgreens?

Materials required:

  • Seeds of good quality
  • An excellent growth medium, such as potting soil or homemade compost in a container. You may also use a single-use growth pad made particularly for producing microgreens.
  • Proper lighting — preferably 12–16 hours per day of sunshine or UV illumination

A method to grow at home:

  • Fill your container with soil, being careful not to over-compact it, and softly water it.
  • Spread the seed of your choice as evenly as possible on top of the soil.
  • Using a light mist of water, lightly spray the seeds and cover your container with a plastic lid.
  • Check your tray regularly and spray the seeds with water as needed to keep them wet.
  • Remove the plastic top after few days when seeds have sprouted to expose them to light.
  • While your microgreens grow and develop color, water once a day.
  • Your microgreens should be ready to harvest after 7–10 days.
  • Things to keep in mind while growing microgreens that you should choose seeds that have not been treated with any chemicals.
  • To guarantee that the microgreens develop successfully, use excellent quality, chemical-free soil.
  • Don’t overwater your microgreens, and make sure your container has drainage holes.
  • Climate is one thing to be kept in mind because some microgreens can grow in some temperatures and some cannot

How Actually Onion Microgreens are Grown?

#1. Soaking:

The seeds of onion are very small and generally, people don’t soak them before planting but a couple of hours soaked in water may help them germinate faster and the output will also be good.

#2. Planting

To begin, put several drainage holes in a growth tray and fill it nearly to the top with dirt. Wet the dirt with the spray bottle and pack it down. We’re all set to start sowing seeds!

Distribute your microgreens seeds evenly throughout the soil surface, including the tray’s corners (you may want to use a shaker bottle). The seeds should be in close proximity to one another. You must, however, guarantee that they are not contacting one other.

Onion seeds, when grown too close together, produce the ideal environment for fungal development in the soil. Instead of covering the seeds with dirt, leave them exposed. Give your onion seeds a nice spritz of water after planting to help them germinate, and then lay the second tray directly on top of them (right side up).

While pushing the onion seeds into the earth, this produces darkness for them to grow in. To guarantee that no light reaches the seeds, you can add up to 5 pounds of weight to the cover. When the onion microgreens begin to develop after germination, they will collectively push up the cover and weight.

#3. Growing

Keep your seeds in the dark for at least 3-4 days after they’ve been planted. During this period, they don’t require water. Remove the seed cover once the seeds have grown into seedlings and are yellow in colour. The sprouts may appear squashed at first, but in the light, they will rapidly rise (and turn green).

Directly beneath the grow light, place your onion microgreens. Because the shoots grow towards the light, we choose artificial light for indoor microgreen growth. The microgreens will develop unevenly if the trays are merely put on a windowsill. You’ll also be able to manage how much light the trays receive each day with a grow lamp (we recommend 8-12 hours).

#4. Harvesting

Onion microgreens have a longer harvest shelf life than most. You’ll be able to harvest in stages rather than all at once (though you can certainly do just one big harvest). However, keep in mind that the flavour of the microgreens will alter as they grow, so don’t wait too long.

As the onion microgreens grow, the tips of the microgreens may dry off. Harvest your onion microgreens when they reach 4 inches in height and begin to lean over (they’ll resemble unmowed grass). Clip the onion microgreens in bunches at least 12 inches above the soil surface with clean kitchen shears (or something similar).

Instead of growing from the top of the stem, onions grow from the bottom. This implies we’ll be able to get another crop out of the trays. Simply continue to care for the microgreens until they regenerate and may be picked once again.

#5. Storing

After harvesting the onion microgreens, don’t wash them until you’re ready to utilize them. As previously stated, the seed husks can be left on or removed from the onions. Whichever green you select, you’ll get a great onion taste with no effort (they won’t even make you weep when you cut them!).

Keep your microgreens, onion, or otherwise, in the fridge in a sealed container. They should last for up to a week if you put a paper towel in the bag to absorb any excess moisture.

This is your journey of growing onion microgreens.

How to Grow Radish Microgreens?

Radish microgreens are one of the most nutritious, healthy and tasty microgreens. They are a very popular microgreen plant that can be quickly grown and enjoyed at home.

Radish microgreens are grown from the same seed that produces the radish bulb or the red, conventional radishes we are used to. Microgreens have a slightly different method of growth.

 For nutritionists, microgreens are loved for the plethora of micronutrients and other essential vitamins that they provide; chefs like them for the crunchy texture and spicy flavour they add to a dish, and plant enthusiasts love them for they are easy to grow.

Radish microgreens are easy to grow and take care of, making them a good candidate for first-time planters. Their seeds are easy to sow, raise and harvest. I’m here to tell you how to grow radish microgreens. 

Also Read: Mold on Microgreens: How to Prevent them?

Benefits of Radish Microgreens

For our health, radish microgreens are a boon. They carry lots of essential nutrients in adequate quantities. Radish microgreens belong to the Brassicaceae family within microgreens.

Radish microgreens seeds sprout to grow microgreens that are tasty, healthy and nutritious.

For health enthusiasts, the vitamin value within these microgreens is the highlight, so let’s first have a look at its nutritional value-

#1 Vitamin B6 and Folate

Radish microgreens contain vitamin B6 and folate, which helps improve the cardiovascular system by breaking down homocysteine which deposits fats in the blood vessels.

The abundance of fat in the blood vessels can cause heart issues and brain haemorrhages.

#2 Cancer deterrent

Radish microgreens are an excellent cancer deterrent food because of the high levels of glucosinolate present in them. 

Glucosinolate is high in antioxidants and wards off bacterial, viral and fungal infections. 

#3 Good for weight loss

Due to the low-calorie value and high fiber content, radish microgreens are an excellent choice for weight loss. Radish microgreens are high in vitamin C that burns fat, and have a fulfilling effect on the stomach.

Add these in a salad or a sandwich and increase your portion size without substantially raising the calorie intake.

#4 Good for the skin

Radish microgreens also have sound effects on the skin. High vitamin C content in these microgreens brightens our skin, dulled by stress, age, pollution, sun, and more.

#5 Good for diabetics

A research study showed that radish microgreens increase glucose uptake of cells by 25-44%. This increase in glucose uptake prevents high sugar levels and helps in controlling sugar.

Also Read: How to Grow Pointed Gourds at Home?

Radish Microgreens V/S Radish Bulb

Both the microgreens and the bulb are grown from the same radish seeds. The nutritional values of the two are also almost the same; they differ only in terms of texture, flavour and variety.

While the bulb is chewy and big, the microgreens are tiny, crunchy, and have a spicy, peppery- taste. The microgreens present a new way to add nutrients with a varied taste and texture.

Unlike traditional radish, microgreens can be used in sales, sandwiches, and toast without the overpowering taste of radish.

How to Harvest Radish Microgreens?

Growing radish microgreens is a simple and easy process; thus, you can adeptly harvest radish microgreens irrespective of your experience in growing plants.

Radish microgreens are grown from the same seeds that produce the red radish bulb. Here are the steps you should take to grow radish microgreens within ten days.

Step 1

Choose a planting tray. You can use a plastic or glass potting tray or even Tupperware. Then, add a premium toting mix to the tray. Once decided, make holes at the bottom of the potting tray to allow water to be drawn up from below. 

Make the soil even and compact both at the bottom and top of the potting tray.

Step 2

Using a spraying bottle to wet the soil. Allow the water to be soaked, and repeat the process. If the ground gets uneven at places, use your hands to press it down gently and even it up.

Step 3

The Next step is to sow the seeds. For radishes, one needs to plant about ten seeds per square inch; thus, for a 38 in² planting tree, one would require about 4.5 g of the seed. You can take the help of online calculators to know the number of seeds you should sow.

Using something like a shaker to sow the seeds will help in their even distribution, and thus healthier growth as each would have space to grow.

Step 4

Sprinkle the seeds in circles around the planting tray and try to spray them as evenly as possible. Once done, use your fingers to spread them away gently. 

The seeds don’t need to be spaced perfectly; once the seeds start to grow, empty areas would be filled up independently.

Step 5

Use the spray bottle to water the seeds. Do not use too much water and ensure that the seeds don’t fly away. Water will help the seeds in settling down in the tray.


Step 6

Cover the tray. Covering the microgreen seeds to prevent light from falling on them is essential to growing microgreens. It is necessary to weigh down and blackout the seeds to ensure that they thrive.


Step 7

Leave the seeds for 2-3 days. The seeds will germinate and grow on their own; the cover on top of them will help retain moisture for this period. 


Step 8

On the second or third day (preferably the third), remove the lid and check on the seeds. If the germination rate looks good and the roots are growing, you can allow them to receive light and increase.

However, if the germination rate doesn’t look good and the seedlings are tiny and are not adequately grown, check if the soil is dry, water it and cover it again for some time.


Step 9

Once the seeds germinate, it is time for them to receive light. At this point, it is best to let them receive as much light as possible, be it sunlight or artificial light in the form of LED, tube light and more.

If the soil looks dry, spray some water to wet the upper layer. Do not water the seeds anymore after this point on.


Step 10

Harvest the microgreens. After 8-10 days, the radish microgreens will be ready to harvest. When their length reaches 2.5 to 3 inches, you can harvest them.

To harvest them, tip the tray at a 45-degree angle and use a sharp knife or scissor to cut them off right above the soil surface. 

Make sure that the soil surface isn’t disturbed. If some get split, just remove it from the microgreens by gently wiping them off. Cut off the amount you need at that time and let the others grow in the sun.

Also Read: How to Grow Chinese Cabbage from Cuttings?

How to Grow Radish Microgreens Hydroponically?

Growing crops hydroponically means that plants are grown without soil, using the mineral nutrient solution as a substitute. The pH level of water plays a vital role in this subset of horticulture.

Hydroponic farming uses something like a growing pad enriched with all the essential nutrients that are otherwise found in soil.

Here’s how to grow radish microgreens hydroponically

Step 1

Balance the pH of the water you will use to water the seeds. The best pH is 6; however, anywhere between 5.5 to 6.5 would do.

Step 2

Prep the trays by pouring two cups of pH balanced water into them. Ensure that the growing pad is saturated in water and move the water around gently to spread it evenly.


Step 3

Spread out the seeds on the saturated growing pad. Sprinkle them evenly or use a shaker. Since radish seeds are larger seeds, use about a quarter of a cup of seeds.


Step 4

Once seeds are spread, wet the growing pad with water and cover. Remember, a blackout is essential for roots to grow properly. Mist the pad every 12 hours.


Step 5

Uncover the tray after 4-5 days when germination is visible. Let it sit under the sun or bright artificial light. 


Step 6

Check up on the seeds daily for a week, mist water when needed and provide ample light.

Step 7

Harvest the greens and enjoy!

Both the traditional method of using soil and the hydroponic method of using a growing pad grow lush, beautiful and tasty radish microgreens. Follow our steps and grow these nutritious greens now.

Mold on Microgreens: How to Prevent & Get Rid of Them

Microgreens have been in steady recognition since the early 1980s. They first came into sight when they were introduced in a Californian restaurant. They have gained immense popularity due to their versatile nature. They add taste, nutrition, as well as texture to your meals.

Surprisingly, one can also grow microgreens at the comfort of their houses. However, they can invite unnecessary problems concerning their proper growth. The most common of all these problems is the presence of mold on microgreens.

These impressive baby plants expect care and protection just like a little toddler. They require constant observation in order to thrive and bloom in the most appropriate way. While their position is still controversial, with some people considering it a sprout, and others as a baby green, one certainty is the way in which one can provide them good care.

In the preceding, you would be acquainted with the solution, causes, and identification process of mold on microgreens. Further, information will also be provided about how to take good care of your microgreens, including protection from molds.

Causes of mold on Microgreens

What causes mold on microgreens? If we know the causes, then perhaps we would also be successful in stopping them at their inception that can get us rid of this problem forever. But, it is not as easy as it sounds. After much research, agricultural scientists have not been able to arrive at any one primary cause that contributes to the growth of mold on microgreens. 

However, we can definitely ponder upon some indefinite cause and get an idea what leads to this disastrous result.

Some people place the blame on the conditions in which microgreens are growing. They believe that those conditions present favorable circumstances for mold to thrive and progress. Some of these environmental conditions include excessive humid or moist climate that does not let the air flow freely and keeps it stagnant.

Further, any temperature range above 70 degrees Fahrenheit also promotes mold on microgreens, which should be kept in check. Secondly, not sanitizing the equipment, seeds, and trays after use give space for molds to grow and prosper freely as much as they want.

Besides this, problems like improper germination of seeds, over watering seeds constantly, and inadequate lighting requirements also promote molds on microgreens.

Preventing mold on microgreens

Ventilation

Stagnant air provides an opportunity to mold to grow and even breed. Therefore, mold cannot thrive in moving air, or a well ventilated space. This gives us a solution to our problem, that is, always keeps the region surrounding microgreens well ventilated.

In order to bring about this change, you need to add some ventilation slots in the container holding microgreens. Next, place a fan in such a way that it directs air straight into the container through those ventilation slots.

You can turn them either for 15 or 30 minutes of each hour to ensure that the air is moving and is replaced by fresh molecules at regular intervals.

Light, Temperature, and Humidity

In order to protect your microgreens from any kind of mold, these three environmental conditions, namely light, temperature, and humidity, are required to be under constant control. It is important to note that light here doesn’t only mean sunlight but also other artificial lights.

The best option is to place them under indirect sunlight most of the time, so that they can get whatever they are missing. Putting them under artificial lights is not preferable and can affect the growth structure of microgreens.

Maintaining a moderate temperature around the crop is appreciated, either through the use of shade, or fans, or other machines. Furthermore, humidity can be a tricky point. Since your microgreens need water, excess of it can cause mold.

In such a situation, one can safely opt for removing moisture out of the air by making use of a high quality dehumidifier. They are affordable and can promote the health of microgreens effectively.

Hydrogen Peroxide

Hydrogen Peroxide can be seen as a perfect solution to the problem of molds on microgreens. They are used to clean the equipment and all the other things in order to keep the microgreens away from the mold.

One can spray hydrogen peroxide on the trays and other apparatus thoroughly using spray bottles of different measurements, according to the quantity of things you want to spray it on. Apart from this, before sowing seeds, one can also sanitize them from hydrogen peroxide that keeps excess moisture and humidity in strict control. You can either prepare this sanitizer organically, or purchase them from markets.

Avoid seed bunching

Collecting all the seeds together, keeping them close, and bunching them can increase the level of moisture between the seeds, while also acting to reduce the airflow. As the microgreens grow together, due the bunching of seeds, the air movement would be restricted, perhaps even blocked.

As the moisture content elevates, and air level is restricted, mold would find a perfect situation to grow. In order to escape such a situation, spread your microgreens seeds evenly throughout the soil, with adequate space between each seed, giving them room to breathe and grow.

Sunlight

Mold is not a friend of sunlight, and it is also something that is present abundantly. If you witness mold on microgreens, then place them under direct sunlight immediately, until the mold is destroyed.

Sunlight acts to dry out the mold present on your microgreens, and fastens the process of removing that mold from your plant. Since direct exposure to sunlight can place your plants in danger, it is important that you prepare for adequate supply of water to your microgreens. A watered tray might be of immense help.

Sanitizing trays

Microgreen trays can become the biggest contributor to mold, if they are not cleaned and sanitized regularly after usage. There are numerous ways through which the trays can catch mold, and can become stubborn to lay off.

One can sanitize trays through a lot of methods. These alternatives can come handy when one or another ingredient is not present with you. Some of these methods include using a dishwasher, a combined spray of hydrogen peroxide, vinegar, and bleach, and spraying distilled water.

In order to keep mold at bay, one should take proper care in sanitizing these trays after each and every use. Multiple brands and their products can be searched for this purpose.

Drainage

A soil with well drainage properties, like perlite, volcanic rocks, age old forest products, or irregularly textured rocks is the perfect soil match for growing microgreens. They do not let unnecessary water accumulate near the plant and safely channels it down, to lower the moisture and humidity content.

A generously porous soil will be of excellent help in this matter.

Trying remedies

Additionally, there are some tried and tested effective home remedies that are easy to use once the presence of mold on microgreens is confirmed. Remedies include combining the aforementioned steps and implementing them adjoint, and not simultaneously.

In doing so, one shall also open ventilation slots while installing a dehumidifier. Provide sufficient direct sunlight, while also maintaining shade at appropriate times. This technique works almost every time and would do so in your case too.

Additional treatment plans

Finally, if nothing is able to get you out of this situation, then we have treatment plants consisting of different ingredients that could be of additional help in cleansing away all the mold from microgreens.

Some of these treatments include using grapefruit seed extract, vinegar, hydrogen peroxide and water, finally, making judgments on your own. You can try them individually to reach for the best solution to your mold on microgreens problem.

How to take care of microgreens?

The right season

Microgreens usually do not take more than 7 to 21 days to grow, and consume. When you are doing this is important. Know which weather is right for your seeds. Some seek humid conditions, while most prefer winters.

Research also shows that moon phases each month provide the best time for seeds to grow, germinate, and bloom.

Protecting

Microgreens are baby plants and so they demand protection and gentle cae just like little kids. They need shelter for a variety of purposes, the first one being the weather considerations. Protecting microgreens until the germination period, not only from the weather, but also from rodents, ants, and other insects is vital.

You can protect microgreens by building a mini greenhouse, or simply with a plastic bag, a glass, lid, or even a bottle.

Feeding them right

It all starts from the food. Feeding them adequate proportions of the required nutrients is important to keep the plants healthy.  The primary food source is the right soil mixture. Pay attention to the soil you use and the nutrients it imbibes.

Choose a soil that promotes well drainage properties and is able to hold moisture for long. You can either purchase commercially present seed soil mixtures, or make a DIY at your own home. Organic mixtures provide exceptional growth.

Transplanting

Transplanting microgreens is by far the most underrated caring tip. You have successfully grown your microgreens, and have probably consumed most of them. Next what? Are you planning to waste the rest of them? Definitely do not do that.

You can use these seedlings and grow them in pots either indoors or outdoors. It is a simple process and does not require much assistance. In order to implement your microgreen transplantation, use a fork to gently lever the seedlings out, holding the leaves, and not touching any other part plant.

Finally, the baby seedlings can be carefully seated in the potting mix using adequate potting mixture. With some days of adequate sunlight, you can see how your seedlings grow out from seeds.

Storage

Storing or harvesting microgreens is a very essential process and it requires subtle training. Difficulties present themselves in hot and humid weather, when they are ready for harvest at the end of that season.

Fans and coolers can be of help, but not for long. A long term and effective solution is refrigeration. Take a sealed container that is spacious enough for your microgreens to be seated and does not bruise them.

Next, snipe them off carefully and place them in a container in the fridge till the end of the season, till the harvesting time arrives. This is a proven method for keeping microgreens fresh, crisp, and alive, for a stipulated time period.

Conclusion

Among the surprising amount of potential health benefits that these little things bestow, one should not undermine the diseases they invite, if not taken care of seriously.

There are a lot of contributing causes that can stimulate the presence of pests, but if one takes proper care and personalised attention to them, then it should not be difficult to achieve a good yield packed with the wellness of your backyard.