
Microgreens have been in steady recognition since the early 1980s. They first came into sight when they were introduced in a Californian restaurant. They have gained immense popularity due to their versatile nature. They add taste, nutrition, as well as texture to your meals.
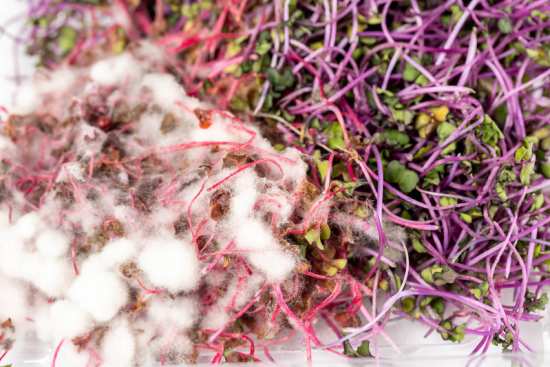
Surprisingly, one can also grow microgreens at the comfort of their houses. However, they can invite unnecessary problems concerning their proper growth. The most common of all these problems is the presence of mold on microgreens.
These impressive baby plants expect care and protection just like a little toddler. They require constant observation in order to thrive and bloom in the most appropriate way. While their position is still controversial, with some people considering it a sprout, and others as a baby green, one certainty is the way in which one can provide them good care.
In the preceding, you would be acquainted with the solution, causes, and identification process of mold on microgreens. Further, information will also be provided about how to take good care of your microgreens, including protection from molds.
Causes of mold on Microgreens
What causes mold on microgreens? If we know the causes, then perhaps we would also be successful in stopping them at their inception that can get us rid of this problem forever. But, it is not as easy as it sounds. After much research, agricultural scientists have not been able to arrive at any one primary cause that contributes to the growth of mold on microgreens.
However, we can definitely ponder upon some indefinite cause and get an idea what leads to this disastrous result.
Some people place the blame on the conditions in which microgreens are growing. They believe that those conditions present favorable circumstances for mold to thrive and progress. Some of these environmental conditions include excessive humid or moist climate that does not let the air flow freely and keeps it stagnant.
Further, any temperature range above 70 degrees Fahrenheit also promotes mold on microgreens, which should be kept in check. Secondly, not sanitizing the equipment, seeds, and trays after use give space for molds to grow and prosper freely as much as they want.
Besides this, problems like improper germination of seeds, over watering seeds constantly, and inadequate lighting requirements also promote molds on microgreens.
Preventing mold on microgreens
Ventilation
Stagnant air provides an opportunity to mold to grow and even breed. Therefore, mold cannot thrive in moving air, or a well ventilated space. This gives us a solution to our problem, that is, always keeps the region surrounding microgreens well ventilated.
In order to bring about this change, you need to add some ventilation slots in the container holding microgreens. Next, place a fan in such a way that it directs air straight into the container through those ventilation slots.
You can turn them either for 15 or 30 minutes of each hour to ensure that the air is moving and is replaced by fresh molecules at regular intervals.
Light, Temperature, and Humidity
In order to protect your microgreens from any kind of mold, these three environmental conditions, namely light, temperature, and humidity, are required to be under constant control. It is important to note that light here doesn’t only mean sunlight but also other artificial lights.
The best option is to place them under indirect sunlight most of the time, so that they can get whatever they are missing. Putting them under artificial lights is not preferable and can affect the growth structure of microgreens.
Maintaining a moderate temperature around the crop is appreciated, either through the use of shade, or fans, or other machines. Furthermore, humidity can be a tricky point. Since your microgreens need water, excess of it can cause mold.
In such a situation, one can safely opt for removing moisture out of the air by making use of a high quality dehumidifier. They are affordable and can promote the health of microgreens effectively.
Hydrogen Peroxide
Hydrogen Peroxide can be seen as a perfect solution to the problem of molds on microgreens. They are used to clean the equipment and all the other things in order to keep the microgreens away from the mold.
One can spray hydrogen peroxide on the trays and other apparatus thoroughly using spray bottles of different measurements, according to the quantity of things you want to spray it on. Apart from this, before sowing seeds, one can also sanitize them from hydrogen peroxide that keeps excess moisture and humidity in strict control. You can either prepare this sanitizer organically, or purchase them from markets.
Avoid seed bunching
Collecting all the seeds together, keeping them close, and bunching them can increase the level of moisture between the seeds, while also acting to reduce the airflow. As the microgreens grow together, due the bunching of seeds, the air movement would be restricted, perhaps even blocked.
As the moisture content elevates, and air level is restricted, mold would find a perfect situation to grow. In order to escape such a situation, spread your microgreens seeds evenly throughout the soil, with adequate space between each seed, giving them room to breathe and grow.
Sunlight
Mold is not a friend of sunlight, and it is also something that is present abundantly. If you witness mold on microgreens, then place them under direct sunlight immediately, until the mold is destroyed.
Sunlight acts to dry out the mold present on your microgreens, and fastens the process of removing that mold from your plant. Since direct exposure to sunlight can place your plants in danger, it is important that you prepare for adequate supply of water to your microgreens. A watered tray might be of immense help.
Sanitizing trays
Microgreen trays can become the biggest contributor to mold, if they are not cleaned and sanitized regularly after usage. There are numerous ways through which the trays can catch mold, and can become stubborn to lay off.
One can sanitize trays through a lot of methods. These alternatives can come handy when one or another ingredient is not present with you. Some of these methods include using a dishwasher, a combined spray of hydrogen peroxide, vinegar, and bleach, and spraying distilled water.
In order to keep mold at bay, one should take proper care in sanitizing these trays after each and every use. Multiple brands and their products can be searched for this purpose.
Drainage
A soil with well drainage properties, like perlite, volcanic rocks, age old forest products, or irregularly textured rocks is the perfect soil match for growing microgreens. They do not let unnecessary water accumulate near the plant and safely channels it down, to lower the moisture and humidity content.
A generously porous soil will be of excellent help in this matter.
Trying remedies
Additionally, there are some tried and tested effective home remedies that are easy to use once the presence of mold on microgreens is confirmed. Remedies include combining the aforementioned steps and implementing them adjoint, and not simultaneously.
In doing so, one shall also open ventilation slots while installing a dehumidifier. Provide sufficient direct sunlight, while also maintaining shade at appropriate times. This technique works almost every time and would do so in your case too.
Additional treatment plans
Finally, if nothing is able to get you out of this situation, then we have treatment plants consisting of different ingredients that could be of additional help in cleansing away all the mold from microgreens.
Some of these treatments include using grapefruit seed extract, vinegar, hydrogen peroxide and water, finally, making judgments on your own. You can try them individually to reach for the best solution to your mold on microgreens problem.
How to take care of microgreens?
The right season
Microgreens usually do not take more than 7 to 21 days to grow, and consume. When you are doing this is important. Know which weather is right for your seeds. Some seek humid conditions, while most prefer winters.
Research also shows that moon phases each month provide the best time for seeds to grow, germinate, and bloom.
Protecting
Microgreens are baby plants and so they demand protection and gentle cae just like little kids. They need shelter for a variety of purposes, the first one being the weather considerations. Protecting microgreens until the germination period, not only from the weather, but also from rodents, ants, and other insects is vital.
You can protect microgreens by building a mini greenhouse, or simply with a plastic bag, a glass, lid, or even a bottle.
Feeding them right
It all starts from the food. Feeding them adequate proportions of the required nutrients is important to keep the plants healthy. The primary food source is the right soil mixture. Pay attention to the soil you use and the nutrients it imbibes.
Choose a soil that promotes well drainage properties and is able to hold moisture for long. You can either purchase commercially present seed soil mixtures, or make a DIY at your own home. Organic mixtures provide exceptional growth.
Transplanting
Transplanting microgreens is by far the most underrated caring tip. You have successfully grown your microgreens, and have probably consumed most of them. Next what? Are you planning to waste the rest of them? Definitely do not do that.
You can use these seedlings and grow them in pots either indoors or outdoors. It is a simple process and does not require much assistance. In order to implement your microgreen transplantation, use a fork to gently lever the seedlings out, holding the leaves, and not touching any other part plant.
Finally, the baby seedlings can be carefully seated in the potting mix using adequate potting mixture. With some days of adequate sunlight, you can see how your seedlings grow out from seeds.
Storage
Storing or harvesting microgreens is a very essential process and it requires subtle training. Difficulties present themselves in hot and humid weather, when they are ready for harvest at the end of that season.
Fans and coolers can be of help, but not for long. A long term and effective solution is refrigeration. Take a sealed container that is spacious enough for your microgreens to be seated and does not bruise them.
Next, snipe them off carefully and place them in a container in the fridge till the end of the season, till the harvesting time arrives. This is a proven method for keeping microgreens fresh, crisp, and alive, for a stipulated time period.
Conclusion
Among the surprising amount of potential health benefits that these little things bestow, one should not undermine the diseases they invite, if not taken care of seriously.
There are a lot of contributing causes that can stimulate the presence of pests, but if one takes proper care and personalised attention to them, then it should not be difficult to achieve a good yield packed with the wellness of your backyard.